
3. Scene Structure
In order to work in-game, the car needs specific nulls to present in all LODs, making sure that all car parts are functioning properly. An example scene is provided in the Dropbox folder with a folder structure and hierarchy to follow (Scene templates/scene_nosuspanim_example_max). Make sure you keep only one set of nulls in your scene and that you use a clear layer structure to hide/unhide layers for exporting various LODs (see example scene). Nulls that MUST be present in ALL LODs:
| Null | Description |
|---|---|
| SUSP_LF | suspension Left Front |
| SUSP_LR | suspension Left Rear |
| SUSP_RF | suspension Right Front |
| SUSP_RR | suspension Right Rear |
| WHEEL_LF | wheel Left Front |
| WHEEL_LR | wheel Left Rear |
| WHEEL_RF | wheel Right Front |
| WHEEL_RR | wheel Right Rear |
| COCKPIT_LR | cockpit Low resolution node |
| STEER_LR | steer Low resolution node |
| DISC_LF | Brake disc Left Front |
| DISC_LR | Brake disc Left Rear |
| DISC_RF | Brake disc Right Front |
| DISC_RR | Brake disc Right Rear |
There are secondary nulls that are needed to complete the car, but are not essential, so it means that in some cases those object can be excluded from certain LODs:
| Null | Description |
|---|---|
| COCKPIT_HR | cockpit High resolution node (A only) |
| STEER_HR | steer High resolution node (A only) |
| RIM_LF | Rim Left Front (A and B) |
| RIM_LR | Rim Left Rear (A and B) |
| RIM_RF | Rim Right Front (A and B) |
| RIM_RR | Rim Right Rear (A and B) |
| RIM_BLUR_LF | Rim Blurred Left Front (A and B) |
| RIM_BLUR_LR | Rim Blurred Left Rear (A and B) |
| RIM_BLUR_RF | Rim Blurred Right Front (A and B) |
| RIM_BLUR_RR | Rim Blurred Right Rear (A and B) |
When it is required to manually animate the suspension, or the car has Dion axle suspension, you have to include some extra nulls in your scene:
| Null | Description |
|---|---|
| REAR_AXLE | for the center of rotation of the Dion Trunk axle |
| HUB_LF | Hub for the suspension Left Front |
| HUB_LR | Hub for the suspension Left Rear |
| HUB_RF | Hub for the suspension Right Front |
| HUB_RR | Hub for the suspension Right Rear |
Nulls/dummy used to define the broken glass mesh:
| Null | Description |
|---|---|
| DAMAGE_GLASS_CENTER_1 | (A and B) |
| DAMAGE_GLASS_FRONT_1 | (A and B) |
| DAMAGE_GLASS_REAR_1 | (A and B) |
| DAMAGE_GLASS_LEFT_1 | (A and B) |
| DAMAGE_GLASS_RIGHT_1 | (A and B) |
The number at the end of name can increase if other nulls/dummy are present. The implementation of damage glass is fully explained in the DAMAGE GLASS section. About Nulls/dummy to animation parts, see the Additional nulls for animations section. For the DAMAGE of car elements, the following nulls must be placed in the PIVOT point of the object around which the object rotates upon impact. The naming conventions for damageable parts are the following:
| Null | Description |
|---|---|
| FRONT_BUMPER | (A and B) |
| REAR_BUMPER | (A and B) |
| MOTORHOOD | (A and B) |
| REAR_HOOD | (A and B) |
| FRONT_WING | (A and B) |
| REAR_WING | (A and B) |
| REAR_EXTRACTOR | (A and B) |
Additional dummies can be:
| Null | Description |
|---|---|
| WIPER_# | for wiper animation (A, B and C) |
| FRONT_LIGHT | for headlight animation (A, B and C) |
| DISPLAY_DATA | for digital displays (A only) |
| DOOR_L and DOOR_R | for exterior door animation (A and B) |
| DOOR_L_1 and DOOR_R_1 | for interior door animation (A only) |
MESH PARTS OF A GENERIC CAR MODEL
The components of a car must be divided in many parts in order to manage animated objects, meshes and other features present in game. Here is a list of mandatory and optional mesh objects. Common exterior parts:
| Part | Description |
|---|---|
| MAIN BODY | Required - must be present in LOD A and LOD B |
| DOORS | optional - only in LOD A if present on the model. In LOD B the doors are not animated but welded to the main body |
| MOTORHOOD | Depends on car type - if needed, must be present in LOD A and LOD B |
| FRONT BUMPER | Depends on car type - if needed, must be present in LOD A and LOD B |
| REAR BUMPER | Depends on car type - if needed, must be present in LOD A and B |
| WHEEL HUB | Optional - contains the brake calipers must exist on LOD A and LOD B |
| WHEEL RIM | Required - must be present in LOD A and LOD B. In LOD C the wheels are simplified. |
| WHEEL RIM BLUR | Required - a version of the rim but with a blurred texture, must be present in LOD A and LOD B |
| WHEEL TYRE | Required - must be present in LOD A and LOD B. In LOD C the wheels are simplified |
| BRAKE DISK | Depends on car type - if needed, must be present in LOD A and LOD B |
| FRONT LIGHT | Depends on car type - if needed, must be present in LOD A, LOD B and LOD C |
| REAR LIGHT | Depends on car type - if needed, must be present in LOD A, LOD B and LOD C |
| WIPERS | Depends on car type - if needed, must be present in LOD A, LOD B and LOD C |
| FRONT WING | Depends on car type - if needed, must be present in LOD A, LOD B and LOD C |
| REAR WING | Depends on car type - if needed, must be present in LOD A, LOD B and LOD C |
Cockpit mesh parts:
| Part | Description |
|---|---|
| COCKPIT_HR | Required - high resolution cockpit, the one that you see in cockpit view. Low Resolution (LR) version also required, including LOD B and LOD C |
| STEER | Required - steering wheel HR and LR interior, LOD B and LOD C |
| STEER PADDLE | Depends on car type, required also in Low Resolution (LR) and LOD B |
| SHIFT | depends on car type - required also in Low Resolution (LR) and LOD B |
| SEATBELTS | Depends on car type - if needed, required also in Low Resolution (LR) and LOD B and LOD C. In LOD A, both ON and OFF position required. In LR, LOD B and C only the ON position model is needed! ON position needed only for the driver, not the passengers. |
MESH NAMING CONVENTIONS
Be consistent in naming mesh objects within your scene. Use a pre-tag such as MESH_ or GEO_ for mesh objects to differentiate them from null objects. Make sure you keep the same names for functional objects (lights and other emissives etc.) throughout the entire scene for all LODs to ensure that the scripts works as intended for each LOD. You can choose to name your objects based on location (when using multi-materials), such as GEO_front_bumper and GEO_main_body (in this case there will be sub-objects divided by the editor at exporting), or based on material grouping, such as GEO_paint_body and GEO_chromes_body.
SETTING UP THE CAR MODEL INSIDE THE 3D SPACE
You can find example scenes in Scene templates folder in the sdk/dev folder! The car must be oriented as shown in the image: The Z vector must be the front direction. The model must be placed with the wheels touching the ground on the 0 coordinate (Y) (see image below). The model bounding box must be centered in YXZ = 0.0.0. (See image below) The car must have 4 different Level of Detail models that must share the same position and orientation!
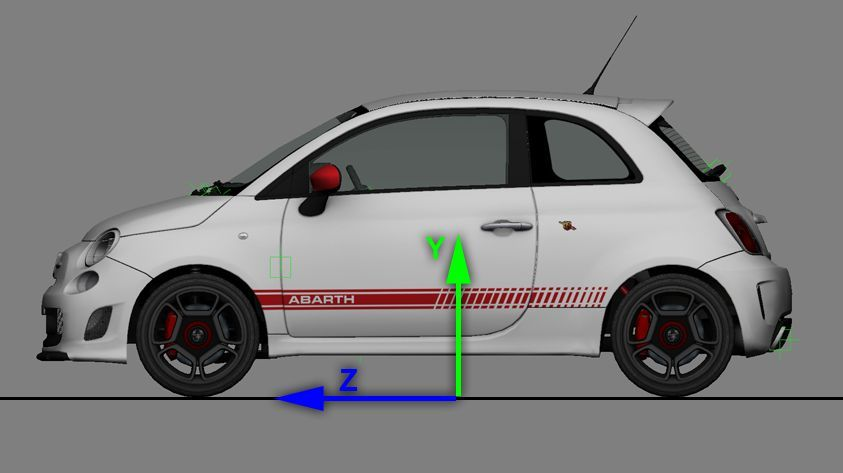
HIERARCHY and ORIENTATION A template file is provided as an example, showcasing how to setup a correct hierarchy for a car. The file contains a set of NULLS or DUMMY objects, that define the CENTER position of any piece of the car. The names of these NULLS must
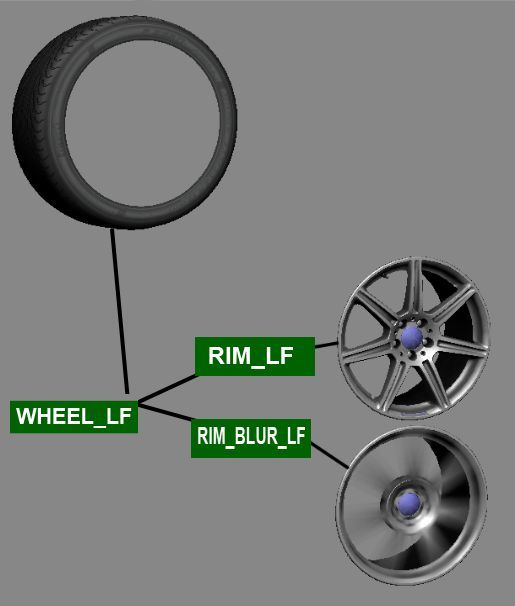
follow specific rules showcased below. The EDITOR will recognize these essential NULLs in order to define the rotation pivot of the wheels, the suspensions and any animatable object in the car. NOTE: Any object that is not a child of a NULL/ DUMMY will be managed like part of the CAR CHASSIS. All the pieces of the geometry that belong to the car must be placed in a HIERARCHY to define the specific properties of each mesh object in the game. Example image on the right: wheels objects are linked to the wheel null/dummy. In the same way you must place all the others pieces like children of the correct NULL that is designed for the part that you are creating. So for the rim there is a dedicated NULL and so on for all the other parts. Remember that every NULL is also the CENTER of rotation. If your mesh is not properly placed under a NULL with a correct center of rotation, the mesh will rotate the wrong way. See the example on the left: the
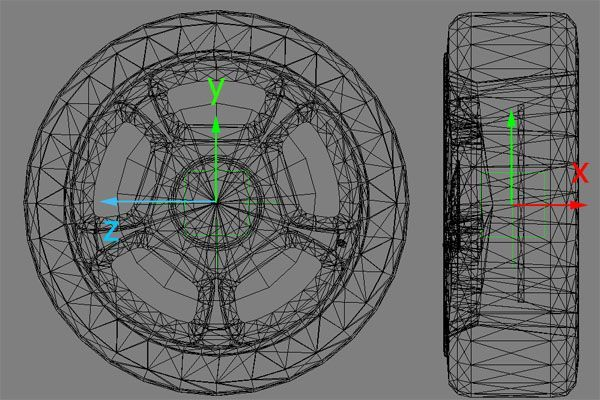
geometry of the WHEEL is centered exactly on the NULL. This will allow the rotation to be correct. In the car example file you'll be able to explore how we placed all the NULLs and the relating mesh objects. The BRAKE DISK must have the center in the same EXACT position of the wheel and the rims.