5. Functional Textures
CAR SHADOWS
The car ground shadows are not generated in real time, such as the sun shadows, but they are very important in order to improve the visual effect of the ground position of the car and emulate an ambient occlusion effect on the ground. For each car there are five
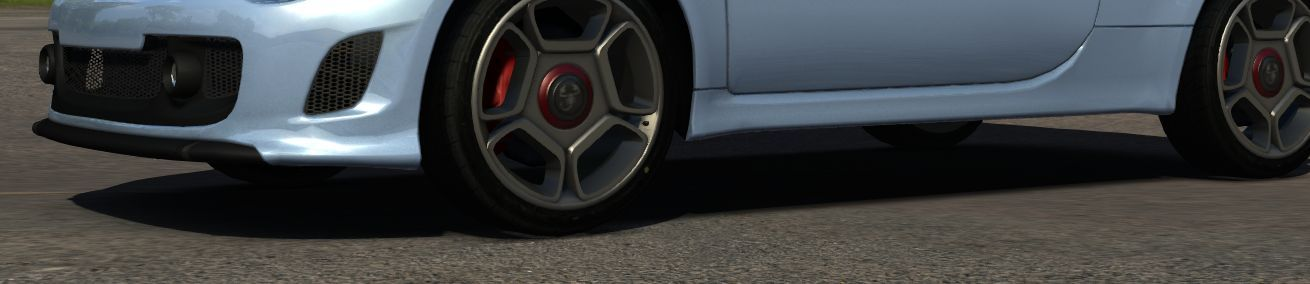
shadow textures. Four textures dedicated to each wheel and another one for the car body. If not present, the car body texture is automatically generated once in game, otherwise an existing one is used. A pre-made texture is used for the wheels shadows. All shadows must be placed in the root custom car folder (see “Asset Organization”)

Examples: This is the BODY shadow of the FIAT 500 car. In game it looks as in the image above: The shadow is blended with the dynamic shadow. Remember to place in the folder also the 4 wheel textures (see example on the left

image). Those work in the same way as the body shadow, but they are attached to the wheels. You can take the automatically generated car body shadow and further refine it in photoshop or your favourite application. NOTE: The auto-generated shadow of the car is very ROUGH. They must be edited in order to obtain a smoother result.
CAR MIRRORS
In order to make car mirrors work, a material must be created (the name is not important), and assigned to the mirror mesh objects. The mesh must be mapped with the texture called MIRROR_PLACEMENT. This texture is

mirrored and the UV must be mirrored as well to make sure it appears correctly. The texture is divided in three areas. CENTRAL must fit the central internal mirror of the car. The red shows the left, while the blue shows the right hand side mirror. The 2 points at the center of the lines indicate a point that must be placed in the center of the mirror to make sure that the cars behind can be clearly seen. Note: remember to keep the correct aspect ratio of mirror UV, otherwise the image of the reflection will be distorted. The image ratio of the MIRROR PLACEMENT template is 4:1. Example of the MIRROR_PLACEMENT file, applied to the various mirror mesh objects:
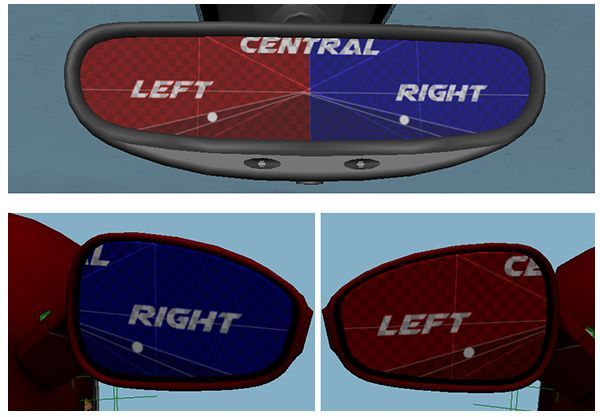
NOTE: Only use the MIRROR_PLACEMENT texture for UV mapping, the actual texture in the editor should be a flat texture named mirror.dds.
INTERNAL WINDSCREEN AND DOOR GLASS REFLECTION
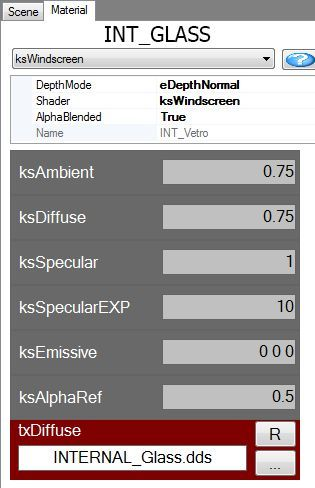
A specific shader is used for the internal of the cars, made specifically to emulate the sun reflection effect when the surface is not completely clear. This effect can be increased or reduced by editing the glass texture provided. The shader to apply at the internal glass is KsWindscreen NOTE: the internal GLASS must be not part of the cockpit HR. Internal GLASS objects on the doors must be linked to the appropriate EXTERIOR door nulls. When the cockpit LR switches, the internal glass must remain visible on the LOD A.
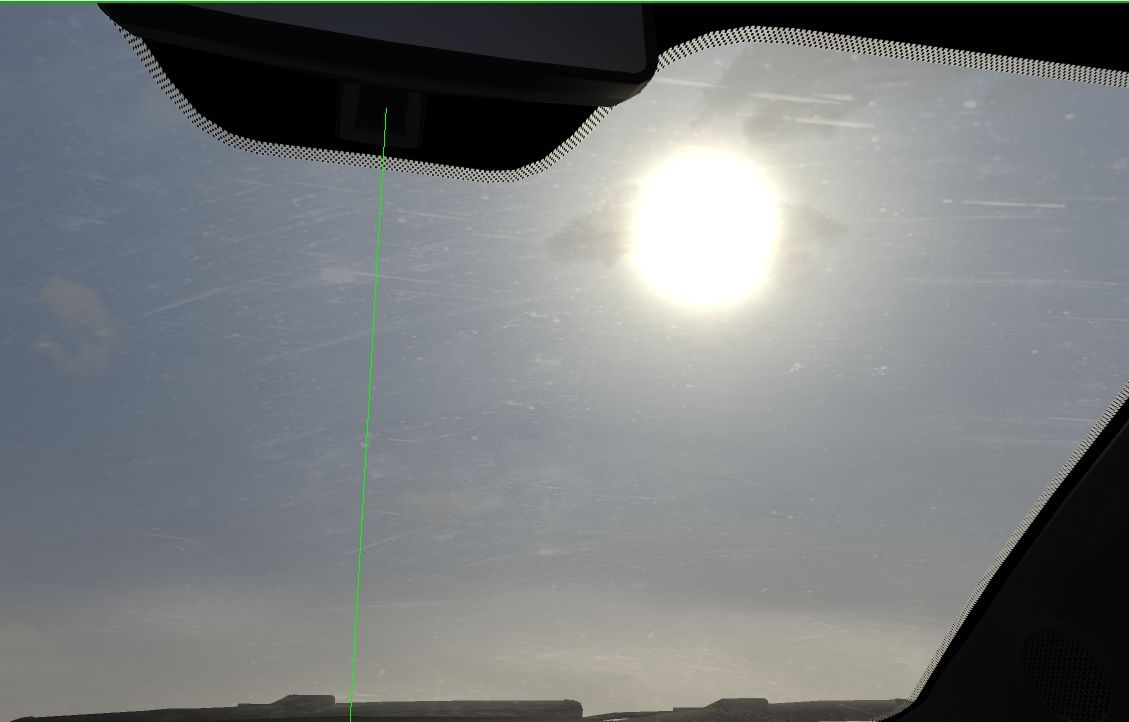
Shader parameters are shown in the image on the right. An example of the shader effect is shown here to the left. The texture for the INTERNAL GLASS must be saved in DDS and it must have an alpha channel and the following layout.
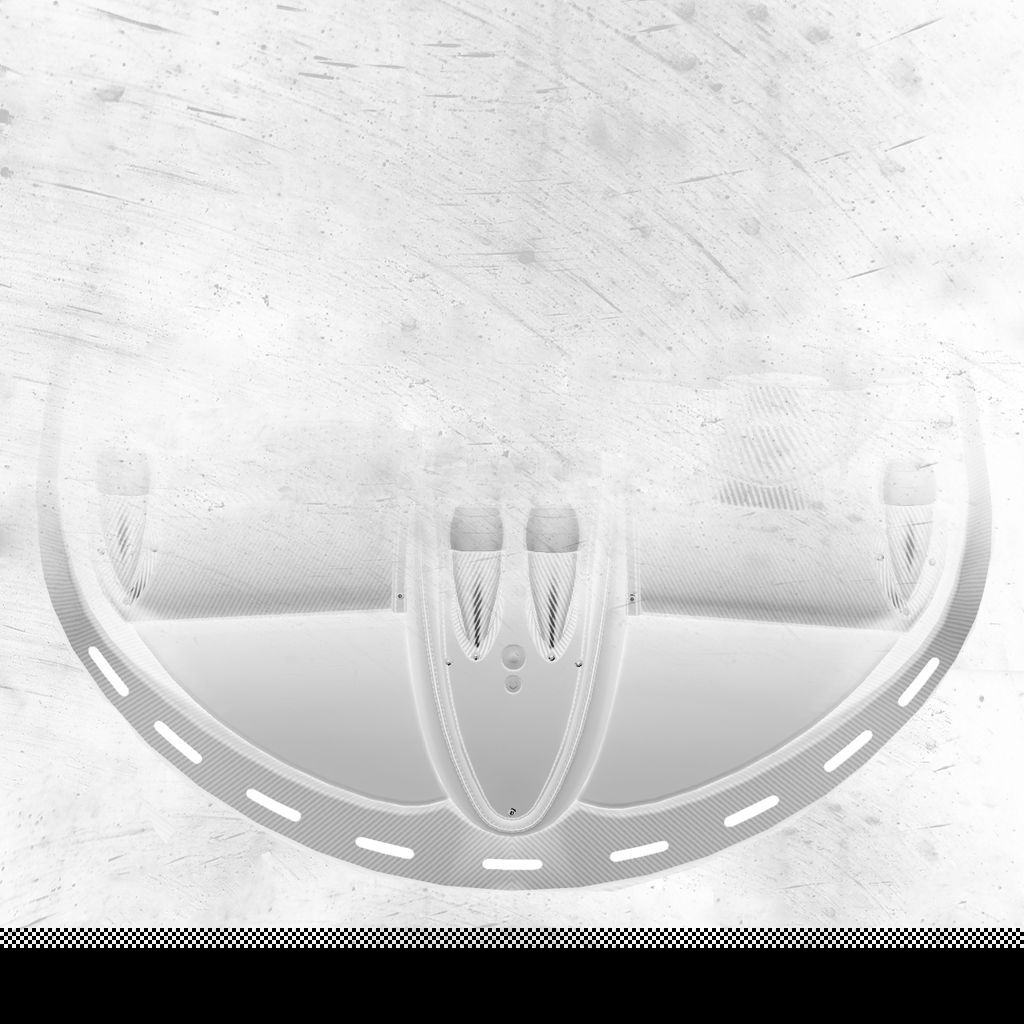
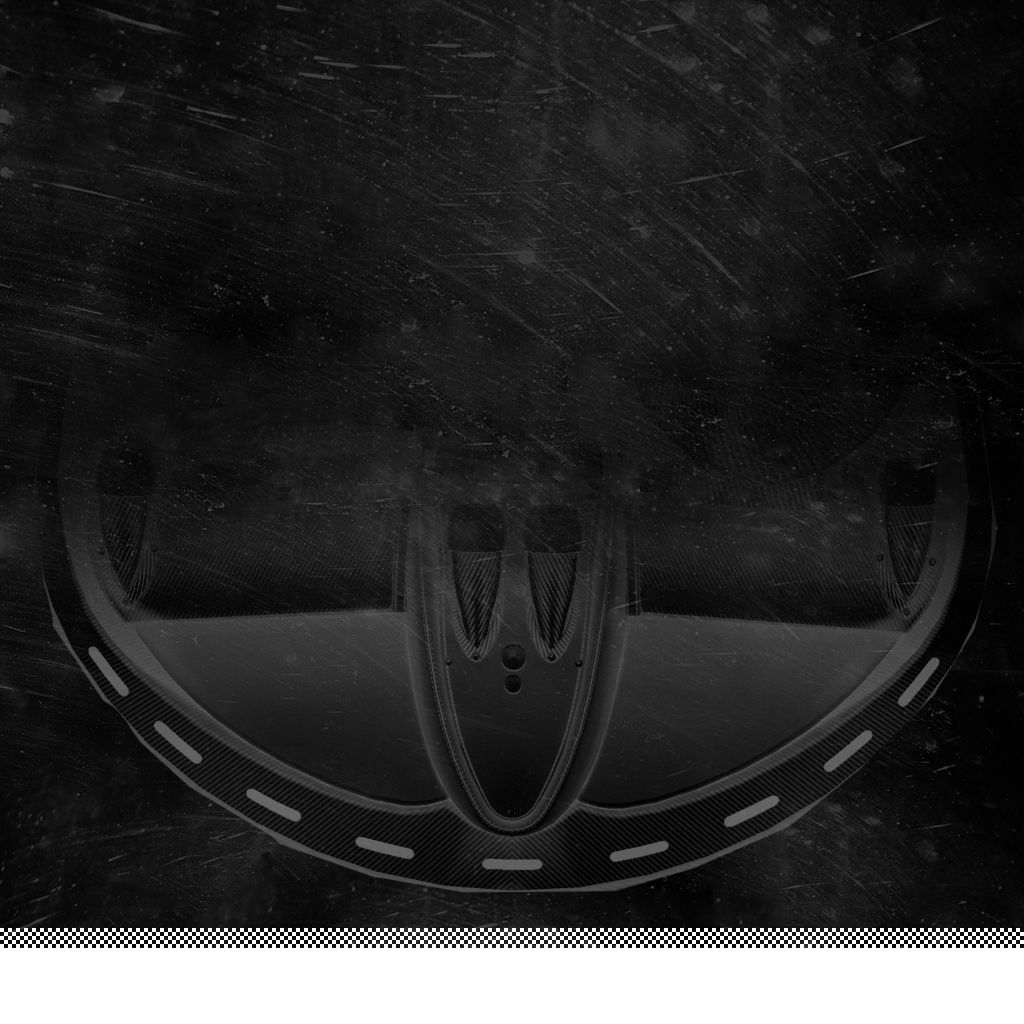
The left image shows the diffuse of the glass texture. The right image shows the alpha channel. A soft shadow of the cockpit dashboard is painted on top of the texture. This trick allows an emulation of the internal reflection of the dashboard on the glass when the sun is in front of the car. Note: The internal glass mesh is just a copy ot the external polygons of the glass, but it should have the normals pointing to the interior. Do likewise for all the internal windows.
DAMAGE GLASS
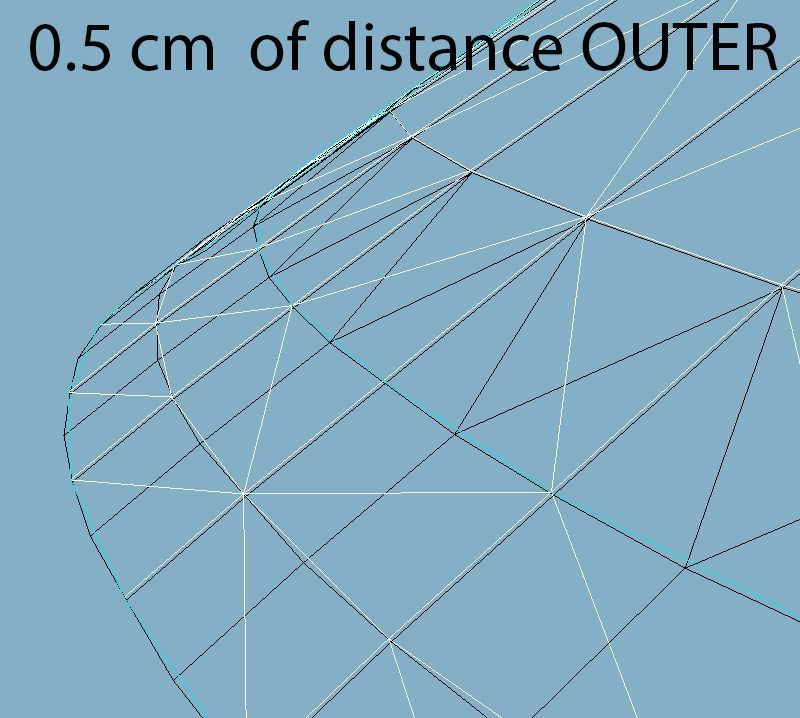
The car can have 2 kinds of damage: damage to glass objects and the body. For the glass we have to do the following: Duplicate the glass object, assign to it a new material and map it using the texture you can find in the Texture common folder called Glass_Crack_00.psd. Then, move it away (0.5mm or less) from the original glass to avoid clipping. See here:1 Try to map the glass approximately as shown here (at
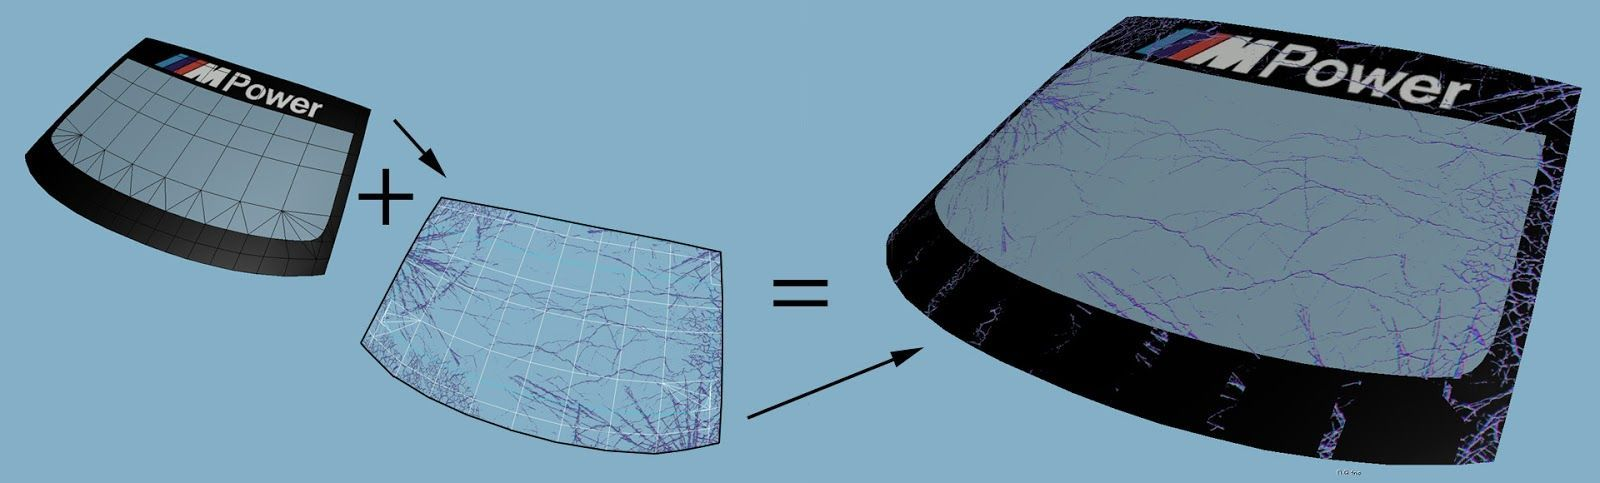
least for the front windscreen), because the broken glass must allow the driver to see the road in the game. The cracks must be more visible in the corners and less so in the center (see image above). You can map other glass objects on a different area in
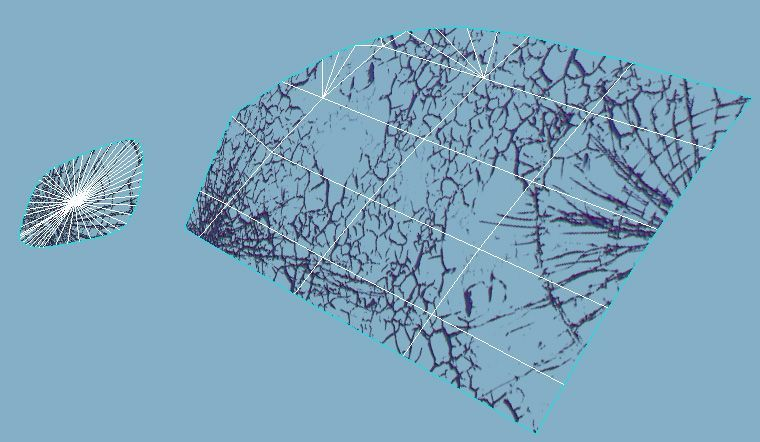
UV, such as the bottom part. Use the radial or fragmented cracks depending on the shape of the object. Radial is good for rounded headlight glass, while the fragmented pattern is usually used for square-shaped headlights or side windows. You can see an example for the side glass: Note that we taken also the mirror glass, because it part of the glass objects that can be broken during side impacts. Once you have extracted your glass damage mesh you must place them under the appropriate nulls that use the following naming conventions. NOTE: the numbers must always be present. DAMAGE_GLASS_CENTER_1 central glass, usually windscreen DAMAGE_GLASS_FRONT_1 front headlight glass or similar DAMAGE_GLASS_REAR_1 rear/brake light glass or similar DAMAGE_GLASS_LEFT_1 left side windows of the door and near DAMAGE_GLASS_RIGHT_1 right side windows of the door and near
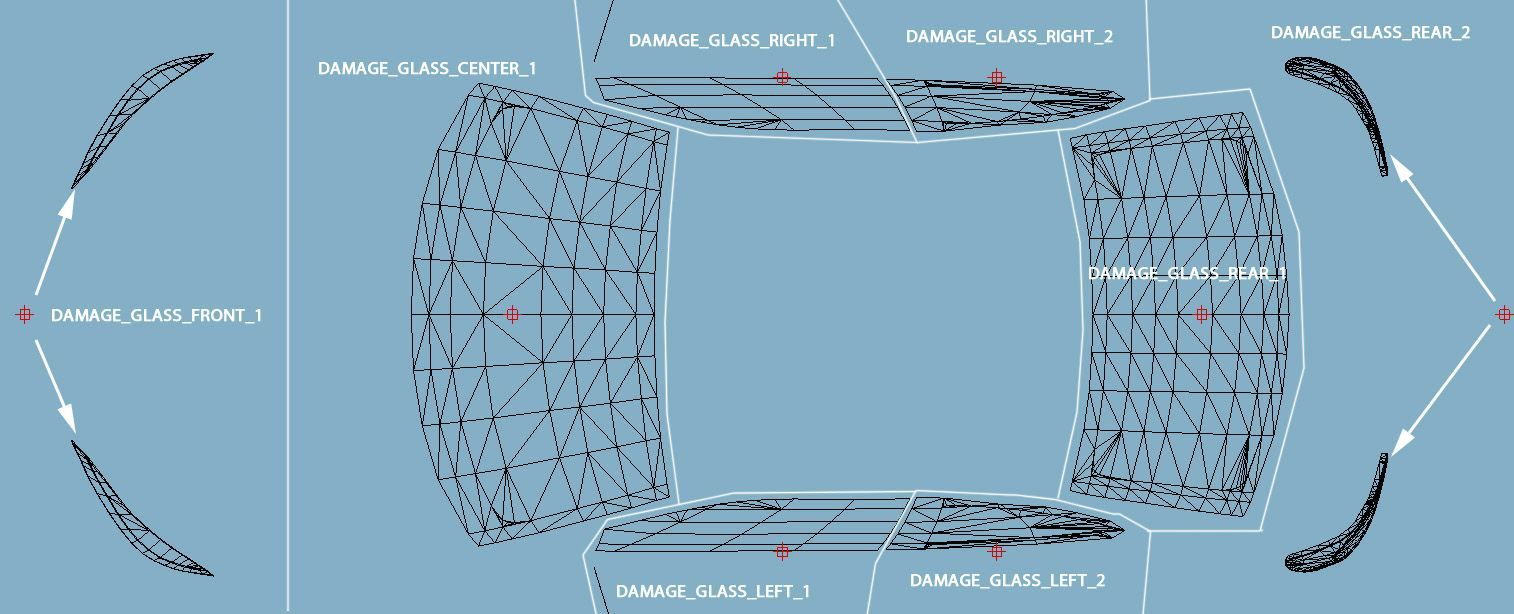
Above you can see an example for how to separate damage glass parts. For the windows you usually have to create more than one object. The same can happen when there are glass objects on the main body as well as on the front bumper. In this case, you can create a new dummy/null and call it DAMAGE_GLASS_FRONT_2. Place this dummy/null as the child of the FRONT_BUMPER null to force the broken front bumper light glass to move along with the FRONT_BUMPER object. Do the same for other glass objects located on various moving parts. You can create as many damage_glass nulls as objects as you need. (for better optimization, use as few as possible….)
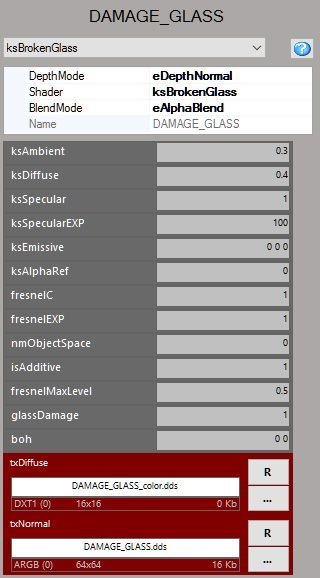
Once you have created, UV mapped and linked the objects, you must assign the proper material with the parameter indicated in the image on the left. Every object of damage glass must be set TRANSPARENT under the object settings and must not cast shadows. As the diffuse and normal map we must apply a PROXY TEXTURE. The Proxy texture is a placeholder texture that substitutes the texture that the game loads automatically from a common folder. For txDIFFUSE use the DDS named

DAMAGE_GLASS_color.dds in the Common Texture folder

For txNORMAL use the DDS named DAMAGE_GLASS.dds in the Common Texture folder After you have set up the material, you must change the draw priority. Select every DAMAGE_GLASS dummy/null (not the object!) and set the priority to -2 and press REORDER. You can check if the
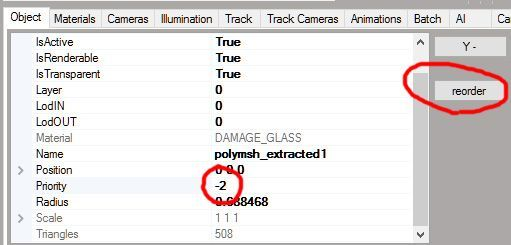
damage glass works correctly by

pressing the appropriate button in the editor. The shortcut to see DAMAGE GLASS in the editor is F4. In the editor you should see the DAMAGE glass as in the image below:
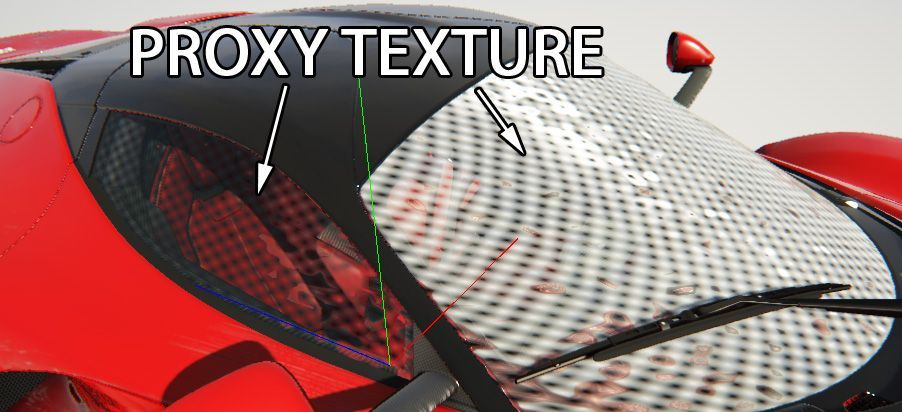
For naming the mesh objects, use a naming convention that is easy to follow, such as MESH_DAMAGE_GLASS_FRONT_1 etc.
CAR DAMAGE
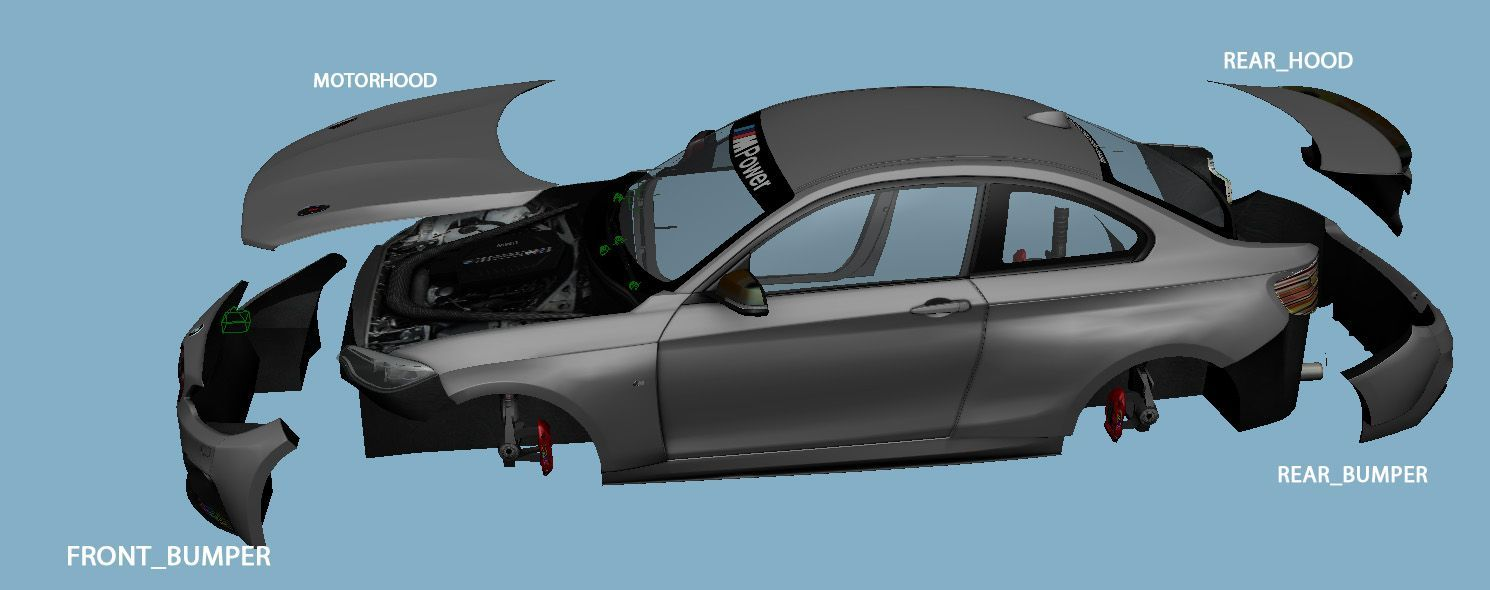
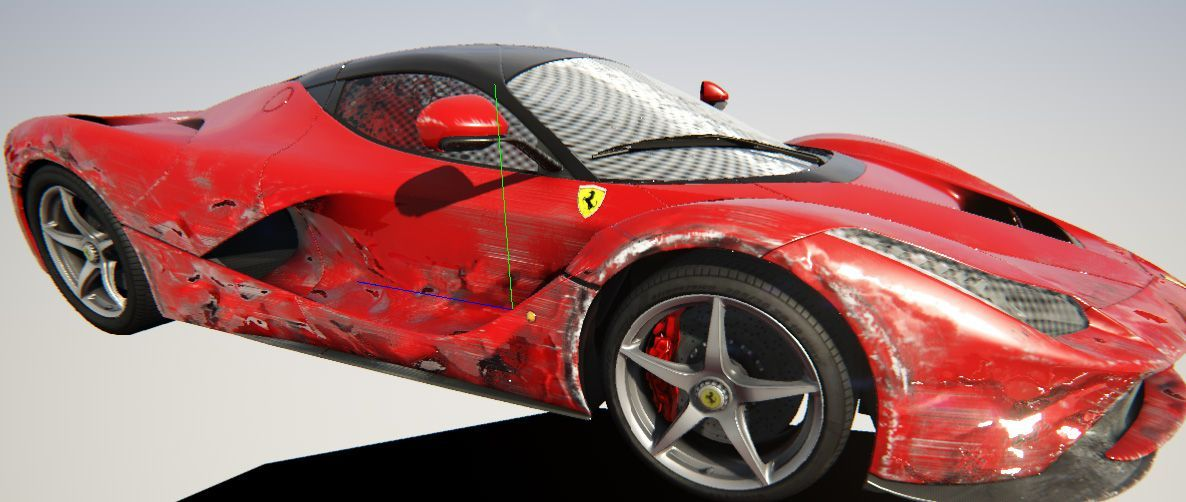
Certain body parts must be detached and placed under a Dummy/null that acts like a pivot/center of rotation for the element when it receives damage. Upon impact, a script is activated that makes the parts vibrate/rotate on the basis of the location and pivot of these nulls. Keep the nulls and also these parts separate in LOD B. In LOD C, the elements can be attached to the main body and they do not have to be movable. If the damaged parts are significant in size (massive front and rear wings on formula cars, you can keep the most important items on the LOD C to make sure there is no visible LOD switch when the car is damaged. Use the following guidelines:
- Make sure that you have closed the mesh in the interior. You put a black texture or something very dark to ensure that there is no gaping hole behind the moving objects.
- Place the dummy/null in the rotation point that is logical for the part. For the MOTORHOOD it can be the hinges, for a FRONT_BUMPER it can be a point that allows rotation but avoiding any intersection with the main body mesh.
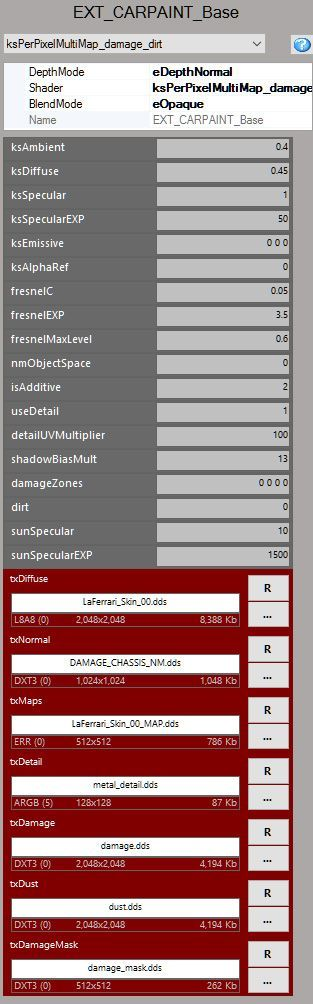
- Detach parts only that don’t leave holes in the car when moving, or carefully cap the holes. Parts that take damage may be: Front Bumper, Rear Bumper, Front and Rear Hood, Exhaust, Wing and the Extractor (diffuser) on various GT cars etc. It depends on the model at hand. After the parts are done, you must set up the material properly and edit a script. Damage needs 4 different textures to work properly: The damage feature to work properly you need the following textures: DAMAGE_NORMAL map, DAMAGE_SCRATCHES map, a DUST map and a DAMAGE_MASK map. The DAMAGE MASK must be called DAMAGE_Mask.dds and must be created in the following way:
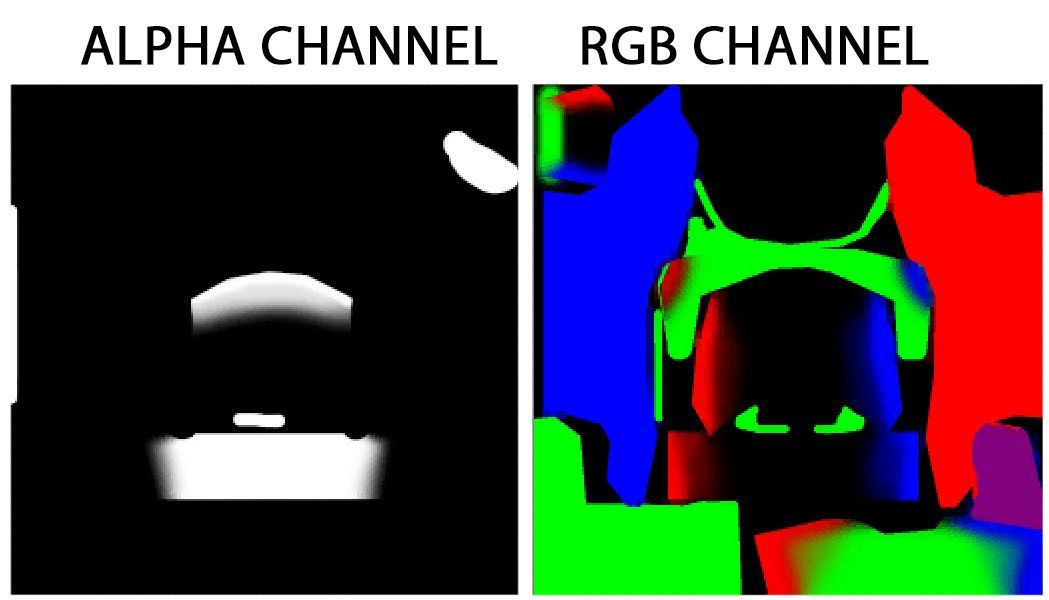
The WHITE part indicates the front of the car (painted in the alpha channel), the RED the left-hand side, the BLUE the right-hand side, and the GREEN the rear of the car. We use this mask to control which areas are affected by the damage. The mask must be painted as shown here:
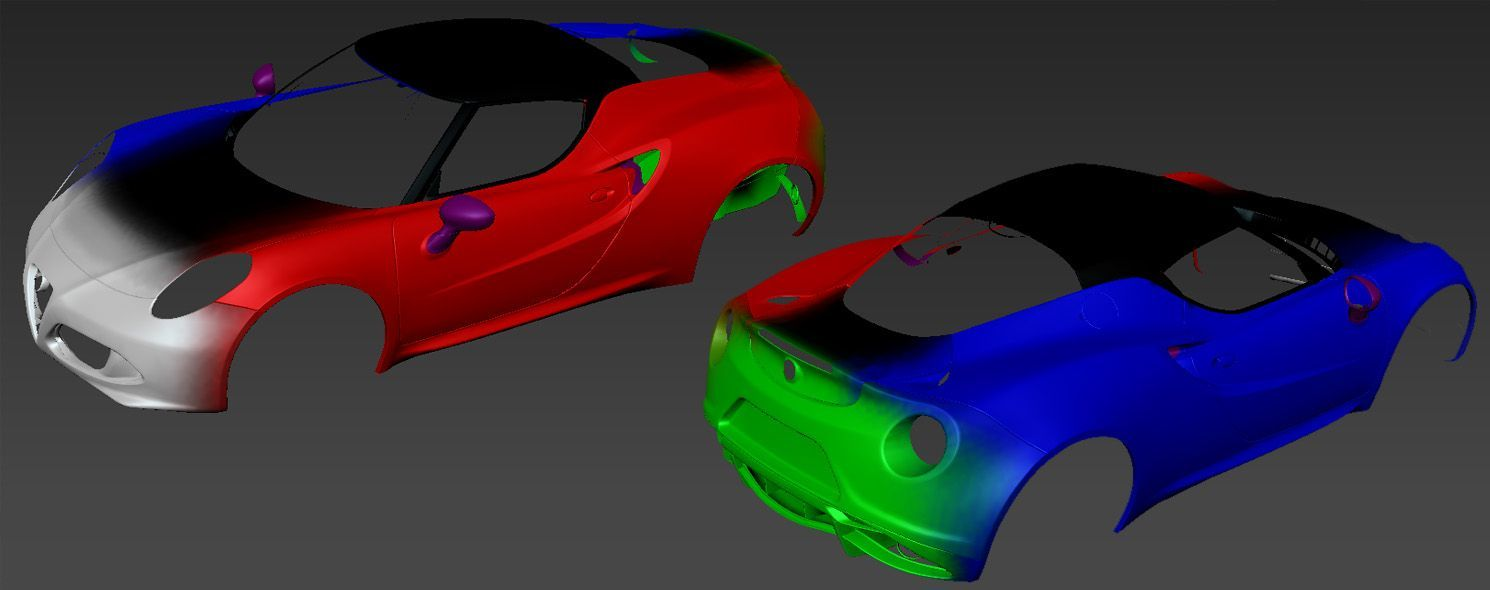
Remember to blend the colors, do NOT create sharp transitions. Never paint the roof and the top of the bonnet. Assign this texture to the slot txDamageMask Resolution must be 512x512 pixels and the texture can be exported as DXT5.
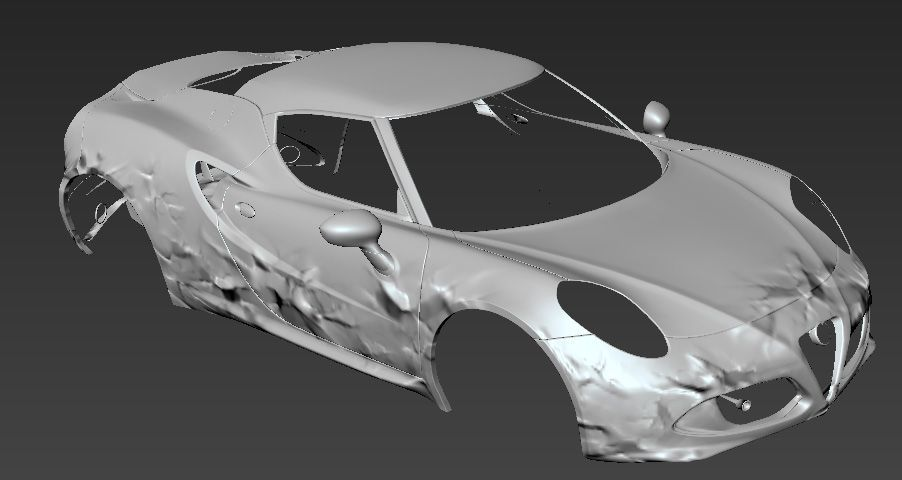
For the NORMAL MAP texture we must create a normal map with the metal deformation as shown in the example. You can use your preferred tool, such as Mudbox, Zbrush, or anything else you’re familiar with. Look at the example:
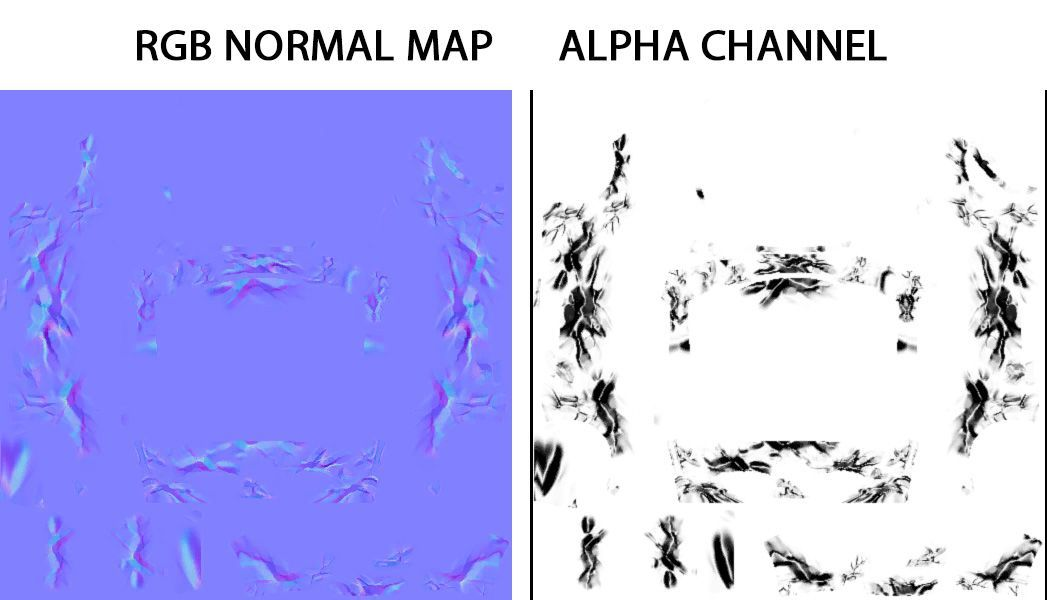
in the alpha channel you must paint the part of the chassis with scratches, which becomes less reflective, to visualize better the wrecked appearance. This texture must be assigned to the slot called txNormal. Texture must be done in DXT5 and size can be 512X512 pixels. For the DAMAGE
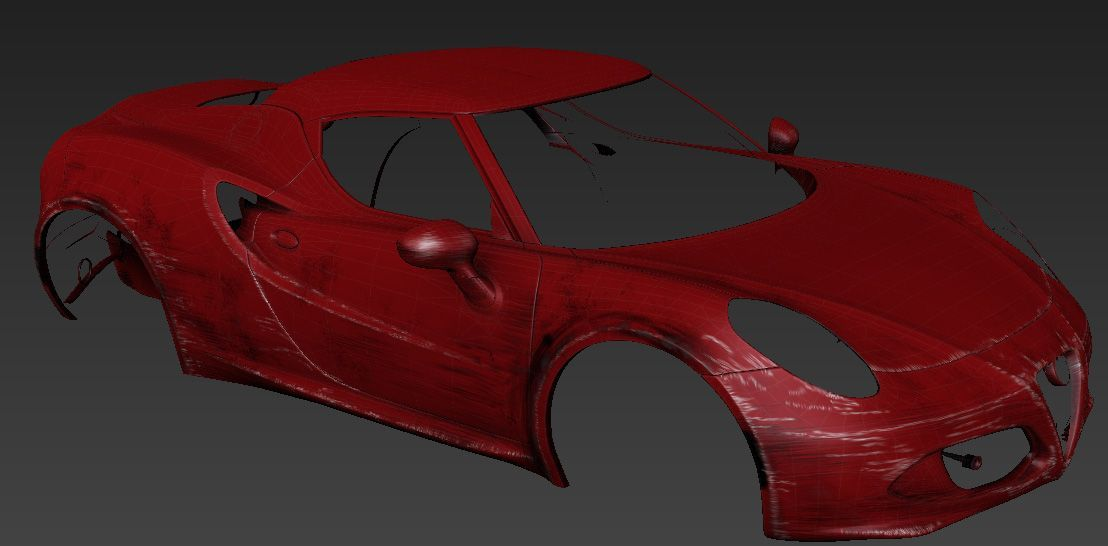
SCRATCHES texture you must paint a texture that, working along with the normal map, shows scratches and damage on the surface. Have a look at example image. The scratches appear in front of a red background here but in the texture use a grey background shown in the texture example below. The scratches on the edges must have a highlight and they must be visible on the sides, too. Scratches appear over the car paint texture so the texture needs an alpha channel to use as a mask for opacity.
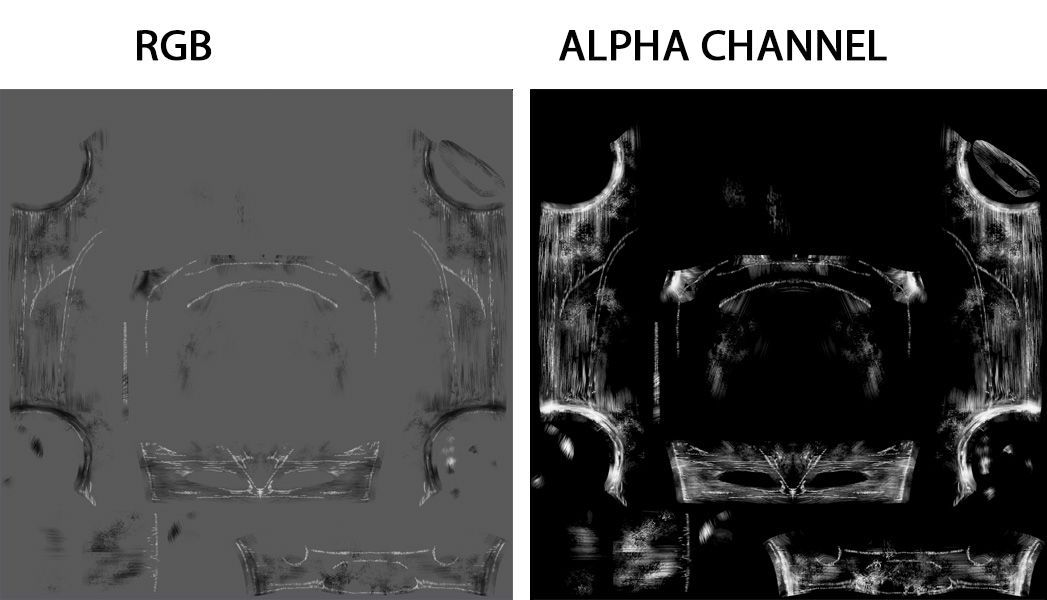
This texture must be assigned to the slot called txDamage. The texture must be exported as DXT5 and the size must be 2048x2048 pixels. The last texture is the DUST texture that shows dirt on the car after driving off-road.
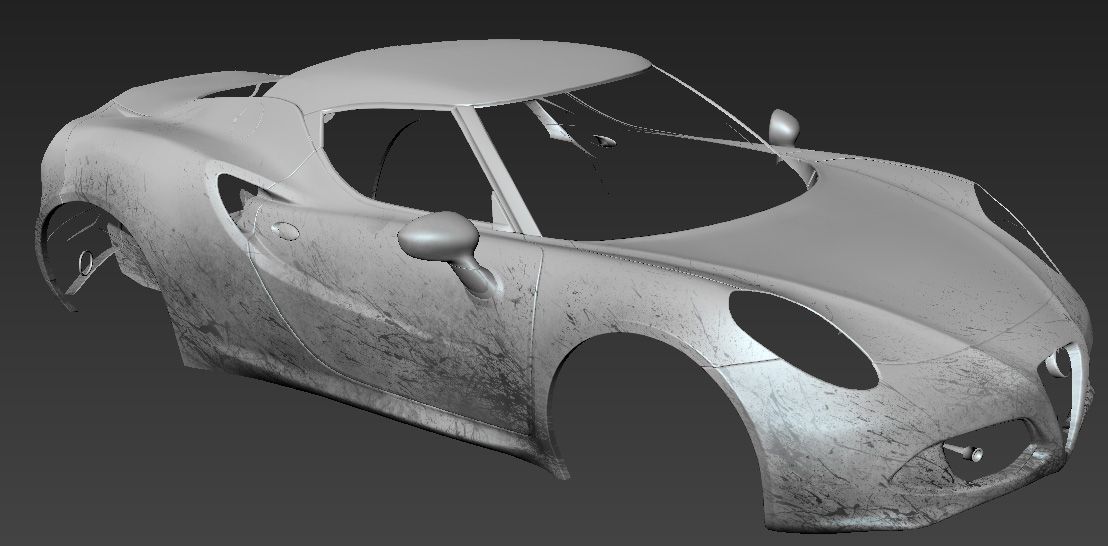
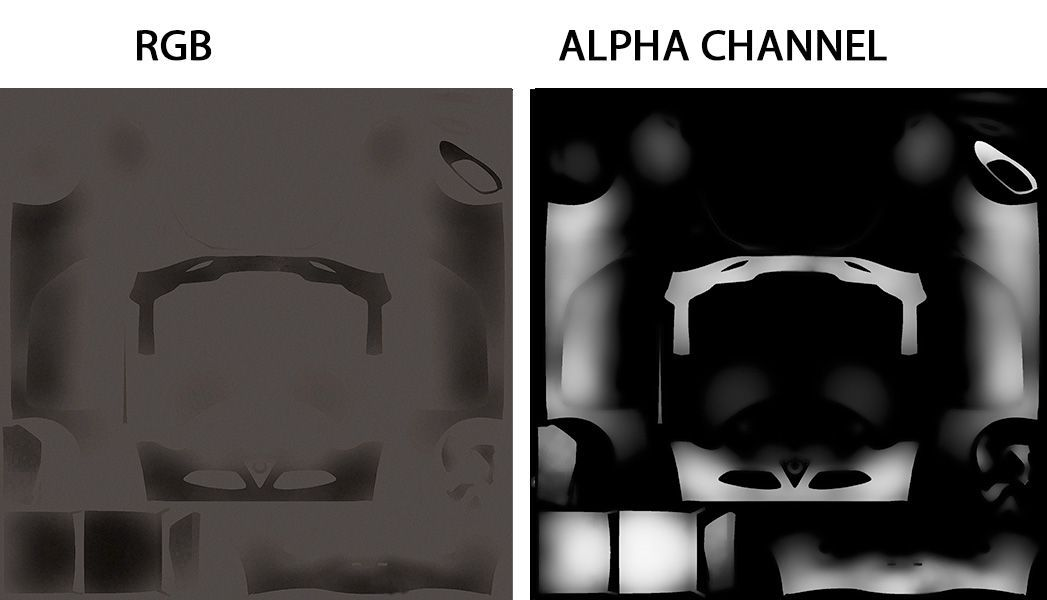
We must draw a dust layer to visualize dry dust. Texture must be done in DXT5 and size must be 2048x2048 pixels or 1024x1024 if the car is heavy on textures. This texture must be placed in the slot called txDust.
To visualize the global effect of the damage you can use the show damage button in editor: