
7. Animations
SUSPENSION ANIMATION
The 3D suspensions of a car can be animated if needed. In order to enable suspension animations, you have to edit the the script “car.ini” with the following values:
“USE_ANIMATED_SUSPENSIONS=1” to enable use of the animations
“USE_ANIMATED_SUSPENSIONS=0” to leave the animations as by default (disabled)
Usually this means the animations are disabled, but on some occasions they are always on like the steering wheel which is automatically animated. NOTE: Animating suspensions do have some disadvantages. Animating suspensions follow predetermined arcs and movements, so the wheels do not represent visually the setup values chosen by the player in game. i.e. Camber angles might differ visibly from the values selected in setup screen. We use a NULL hierarchy to animate the suspension geometry. Here’s an example below
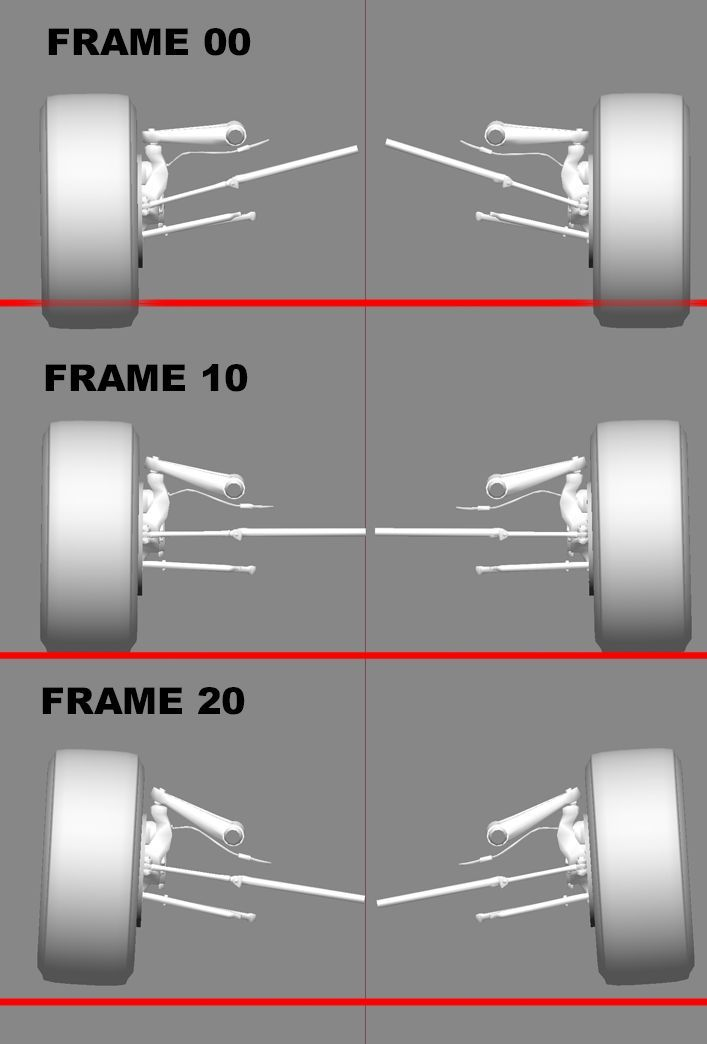
- Set your timeline frames to (for example) 20 frames.
- The frame 0 will be lower position.
- The frame 10 will be the neutral position.
- The frame 20 the higher position. The engine works as follows: It verifies the position in the y axis of the suspension and finds the right frame to match the animation to the position of the physical suspension. It will interpolate the frames to generate a smooth movement. Assetto Corsa will search for the following NULL/DUMMY objects, named as follows:
SUSP_LF
SUSP_LR
SUSP_RF
SUSP_RR
The NULL/DUMMY must be designed to move the suspension on the Y axis. Example of how to animate a suspension correctly: NOTE: Before exporting the FBX, timeline needs to be set with the same number of total frames as the number of animated frames created. Example: If you animate 20 frames, do not export with a timeline of 30. This will cause a crash. Remember to set the timeline to 20 if you have animated 20 frames. Empty frames will cause a crash and are not supported. Suspension Hierarchy The suspension must have the hierarchy identical to one of the two FBX examples provided: TEMPLATE_Suspension_EASY.fbx and TEMPLATE_Suspension_COMPLEX.fbx The first scene contains a simple suspension hierarchy, made for a car with simple suspension system. The second is prepared for complex suspension hierarchy, like 60’s Formula 1 cars, with more complex arms and particular suspensions. Those examples contains more DUMMY/NULLs Some names can be customized and we have named the customizable DUMMY/NULL in an appropriate way, inside the template.fbx ”Custom_name##”. (where # is a number) All the DUMMY/NULL are used for animated parts. Their use is optional. You can create the necessary number of DUMMY/NULL as you desire. The following DUMMY/NULLs are mandatory:
Suspension Nulls:
| Null | Description |
|---|---|
| SUSP_LF | Left Front |
| SUSP_LR | Left Rear |
| SUSP_RF | Right Front |
| SUSP_RR | Right Rear |
Hub Nulls:
| Null | Description |
|---|---|
| HUB_LF | Left Front |
| HUB_LR | Left Rear |
| HUB_RF | Right Front |
| HUB_RR | Right Rear |
Wheels Nulls:
| Null | Description |
|---|---|
| WHEEL_LF | parent of the TYRE_LF for the tyre mesh, RIM_LF for the Rim mesh, and RIM_BLUR_LF for the Rim Blurred mesh |
| WHEEL_LR | parent of the TYRE_LR for the tyre mesh, RIM_LR for the Rim mesh, and RIM_BLUR_LR for the Rim Blurred mesh |
| WHEEL_LR | parent of the TYRE_LR for the tyre mesh, RIM_LR for the Rim mesh, and RIM_BLUR_LR for the Rim Blurred mesh |
| WHEEL_RR | parent of the TYRE_RR for the tyre mesh, RIM_RR for the Rim mesh, and RIM_BLUR_RR for the Rim Blurred mesh |
In some cars, the transmission shafts might be visible. There is a convention name to animate these objects automatically. Transmission DUMMY/NULL names:
| Null | Description |
|---|---|
| TRANSMISSION_L_1 | for the Left shaft |
| TRANSMISSION_R_1 | for the Right shaft |
If you have more transmission pieces to animate, you can use sequential of numbering. For example: TRANSMISSION_L_2 , TRANSMISSION_L_3 and so on. The same applies to TRANSMISSION_R_2 and so on. The engine recognizes the prefix “TRANSMISSION_L_” and looks for a sequential number after it. There is no hard-coded limit on the number of transmission parts that can be animated. The transmission nulls rotate on the X axis and needs to be
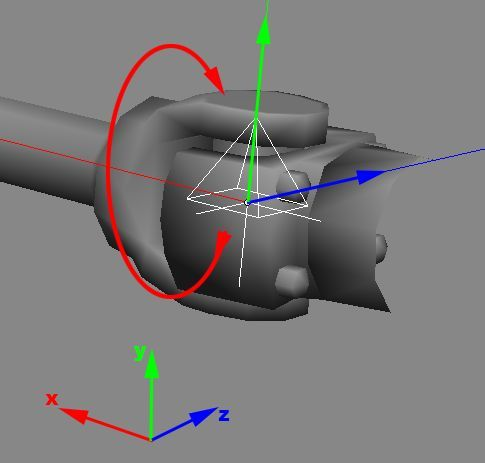
oriented like the image below: This node is useful for animating the joint on the Y axis according to the suspension animation, and the engine automatically rotates the transmission according to the wheel on X axis. Avoid animating on the Z axis, as it is not used. NOTE: In order to have a correct direction of rotation, the Z axis of the transmission nulls always need to point forward. The engine recognizes 4 other nodes for the the hubs of every wheel. These nodes are designed to allow the hub to rotate in accordance with the camber of the wheel.
HUB_LF
HUB_LR
HUB_RF
HUB_RR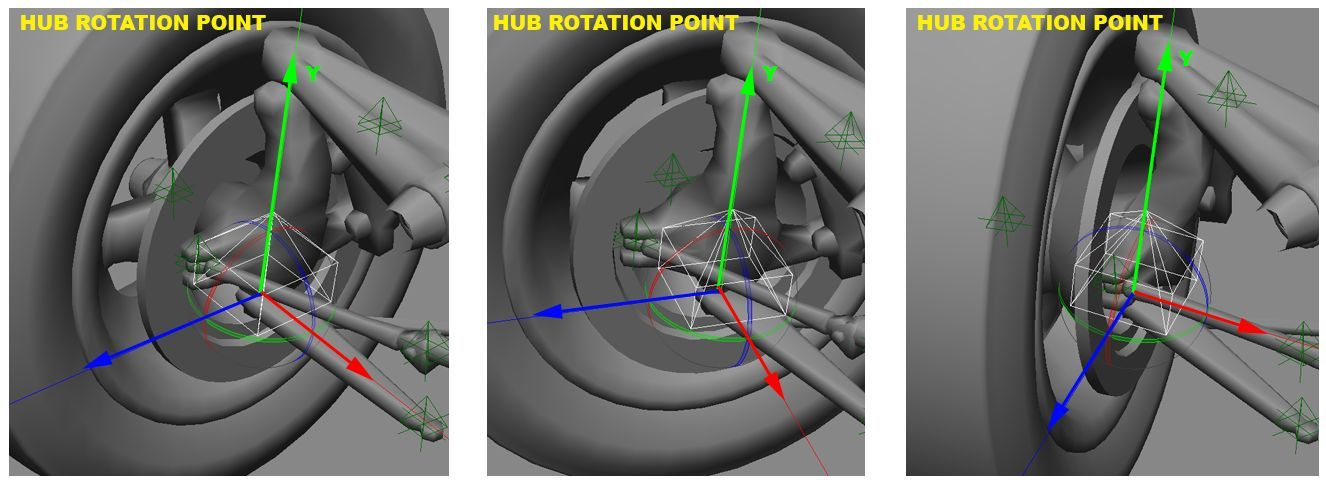
In the above image example, the hub is the parent of the steer arms. This way you can animate up and down movements of the hub or the suspension and during the animation you can change the camber of the hub as required by the actual physical suspension layout. Inside the TEMPLATE_Suspension_COMPLEX.fbx you can find an example for the correct hierarchy. Note: The SUSP_ node must always match the position of the Wheel_ node. The AC engine verifies the position of the suspension in 3D space by checking the SUSP_ node. The wheel bounding box is recognized between the SUSP_ node and Wheel_ node. Those 2 positions must be the same. Again the FBX file TEMPLATE_Suspension_COMPLEX.fbx is a perfect example. STEER ARMS and DIRECTION CONSTRAINTS We can animate many different parts and just import the animation to the editor and from that export to the game, but the STEER arm cannot be animated. Its position changes in the 3D space according to the HUB rotation. In order to constrain the movement of the steer arm to the HUB’s position and rotation, the convention name with a prefix “DIR_customName” must be used. This indicates the direction of the X negative axis of this mesh, and the null called “customName” will point the X axis to the correct direction. Example: a null called “SteerArm_L” will point the negative X axis in direction of a null named “DIR_SteerArm_L” Pay attention to the rotation of the null which the animated mesh is linked to. In the image below the right-hand side Null point has a positive Z axis. The left Null point has a negative Z axis. This allows the -X axis to point to the center of the car or any other direction required by the mesh. Inside the TEMPLATE_Suspension_COMPLEX.fbx file, you can find a proper hierarchy example.
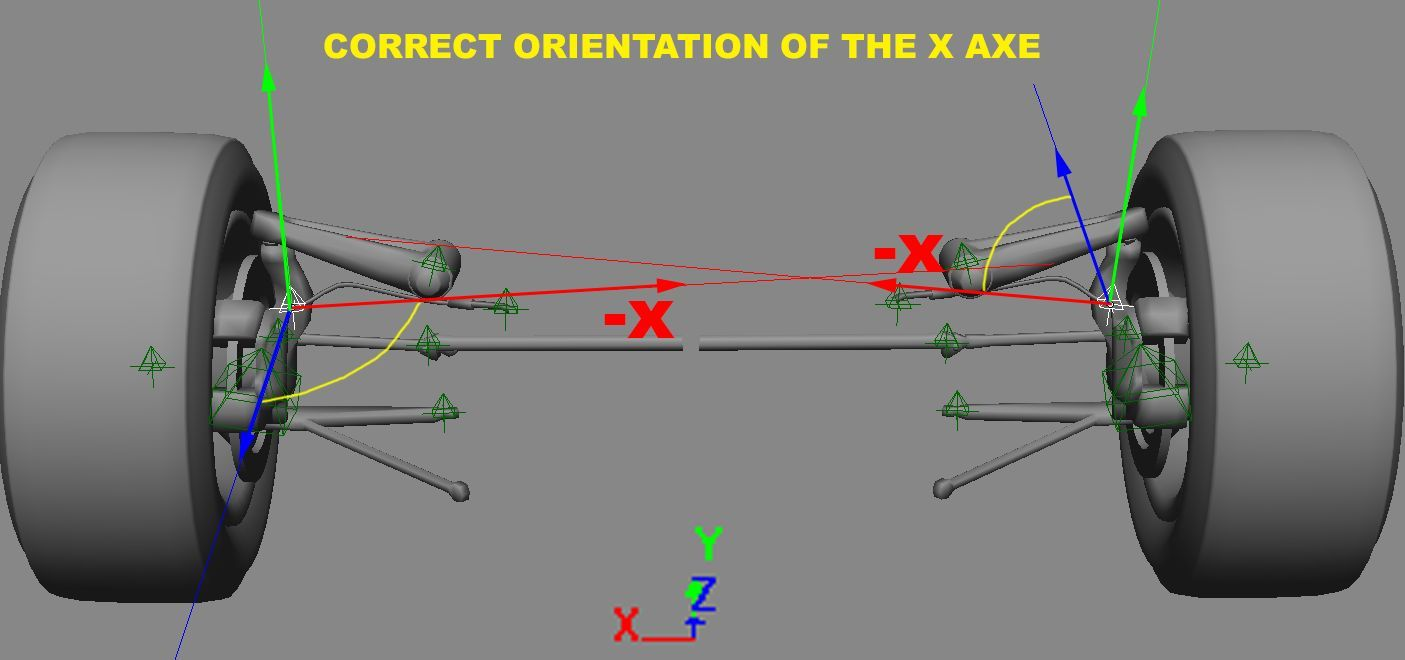
Note: You can create more constraints, if you have more objects to constraint to the HUB by simply giving them different names. Nevertheless, it is always good in terms of optimization to use the lowest possible number of constraints. You can animate your custom nulls in the following vectors: Rotation - Translation - Scale. Inside the TEMPLATE_Suspension_COMPLEX.fbx example file, you can see the animation of the suspension spring, on SCALE Y . Note: Never animate the mesh. Always animate the NULLs only! With this approach you can change and update your mesh every time you want without re-exporting the animations. Use the same technique to create animations for any NULL that has to be animated. For example, doors, gearbox levers, or any other parts.
CONSTRAINT FULL ANIMATION SETUP
If you don’t want animate the suspension manually you can create a full CONSTRAN setup. You can use the DIRECTION CONSTRAINT logic to force you suspension to work automatically without animate them A example of this kind of suspension setup can be found in the EXAMPLE FBX provided with the SDK.
| File | Description |
|---|---|
| Costraint_suspension_Only.fbx | for generic FBX 2014 version |
| Costraint_suspension_Only_XSI_2014.scn | for XSI 2014 version |
| Costraint_suspension_Only_MAX_2013.scn | for 3ds MAX 2013 version |
ANIMATION EXPORT
Once you have animated your NULL/DUMMY inside your scene, using the AC Editor you need to export the animation to an AC-specific clip format, called name.ksanim.
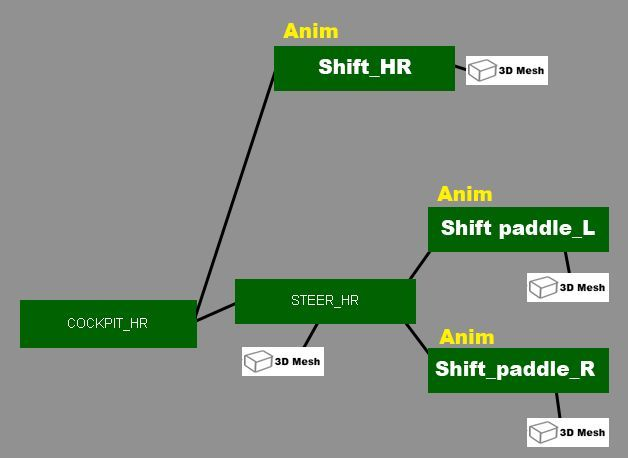
A couple of rules must be followed:
- To generate a clip, you only need to animate the nulls. Animating the mesh itself is not needed. You can also export the mesh, but the editor will only export the objects/nulls that have animation keyframes. As we mentioned before, it is a good technique to animate only the NULL/DUMMY so that you can change your animation independently from the actual 3D mesh.
- When you export an animated null, you must also export the the hierarchy tree above it, as the name of an object inside the editor is determined by its position in the hierarchy tree.
- Always export using the FBX format, as it is the only format that supports animation. Do not use any other formats. In the example shown in the image above, we have two null hierarchies that contain meshes as their children. We have animated the shift and steer paddle and we need to export the animation. We cannot export the SHIFT PADDLE_L null only. We must take the entire hierarchy from COCKPIT_HR, including STEER_HR and SHIFT paddle_L. This way the editor will define the null related to the position of SHIFT PADDLE_L in the hierarchy.
OPTIMISING ANIMATIONS
- The frames are interpolated in the game. You don't need to export an animation with all the keyframes. For simple animations, like doors, gear levers and so on, you can export just the important frames only. For a simple door animation, the “close” and “open” frames are enough, the game will interpolate the rest. When you have more complex doors, with pistons, vertical openings, like those in a Mclaren P1, you can add more frames to animate the door in a more precise way. But always keep in mind that the less frame you use, the more optimized the result will be, because the engine interpolates smoothly between the keyframes.
- Identical frames are optimized. If you create multiple identical frames, and the variation between them is 0, the frames will be optimized. Example: A gear lever starts animation at frame 15 of the complete animation, because during previous frames it stays fixed to its position, waiting for the driver’s hand to first reach it. A keyframe must be placed to frame 0 and another one at frame 14, both in static position. The animation of the gear lever starts at frame 15.There is no need to place more keyframes between 0 and 14.
CLIPS AND NAMING CONVENTIONS
There are two types of pre-programmed playbacks:
- Ping-pong: The animation played reaches the end is then played in reverse from back to start.
- Loop: When the first frame match the last frame and the animation restarts the loop. The specific naming conventions have a pre-programmed playback in-game, so the engine knows whether the playback should be LOOP or PING-PONG..
DRIVER ANIMATION CLIP NAMES:
| Clip | Description |
|---|---|
| steer.ksanim | Loop for the rotation of the driver’s arms on the steering wheel |
| shift.ksanim | PingPong for the animation of the driver’s arm to the gearshift lever (we usually do a simple animation, check the fbx example) |
| shift_dw.ksanim | PingPong for the animation of the fingers that operate the paddle to shift down (usually left) |
| shift_up.ksanim | PingPong for the animation of the fingers that operate the paddle to shift up (usually right) |
CAR ANIMATION CLIP NAMES
| Clip | Description |
|---|---|
| car_shift.ksanim | PingPong to animate the car gear lever |
Important: this clip must have the same number of frames as the shift.ksanim to match the arm movement with the shift animation. If in the driver animation, the shifting movement begins at frame 10, the shifter must also start to move at the exact same frame!
| Clip | Description |
|---|---|
| car_susp_LF.ksanim | Controlled by engine for the animation of the Left Front suspension |
| car_susp_LR.ksanim | Controlled by engine for the animation of the Left Rear suspension |
| car_susp_RF.ksanim | Controlled by engine for the animation of the Right Front suspension |
| car_susp_RR.ksanim | Controlled by engine for the animation of the Right Rear suspension |
| car_door_R.ksanim | PingPong for the animation to open the right-hand side door (the closing animation should be the open animation in reverse. Do not animate the closing sequence!) |
| car_door_L.ksanim | PingPong for the animation to open the right-hand side door (the closing animation should be the open animation in reverse. Do not animate the closing sequence!) |
| car_wiper.ksanim | Loop for the animation of the wiper (here you must animate the full animation back and forth) |
| lights.ksanim | PingPong for the animation of the car lights that are dynamic (e.g. Ferrari F40. Animate the opening sequence ONLY). |
| car_shift_up.ksanim | PingPong for animating the paddle shift up |
| car_shift_dw.ksanim | PingPong for animating the paddle shift down |
Note: You can create all the animations needed. You can also use new names and then engage them from an .ini script (such as active DRS, wings etc.). The names listed above are recognized automatically and managed by the game engine. For example: the animation car_wing.ksnim is a custom name. On certain cars we created animations called wing_rear.ksanim or wing_side.ksanim. These optional animations are managed from .ini scripts.
| Clip | Description |
|---|---|
| car_wing.ksanim | PingPong for the animation of dynamic wings (animate only opening sequence) |
EXPORTING ANIMATIONS FROM THE EDITOR
Follow these steps to export animations:
- Open the car FBX in the editor.
- Open the ANIMATION with the Open FBX Animation option under the File tab (see below):
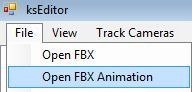
- Find and load the FBX animation that you had previously exported to the “animations” folder. When an animation is loaded it automatically saves a clip_name.ksanim file in the same folder where your FBX file is located, there is no need to manually export the animation clip.
- Select the Animation tab at the bottom part of the editor UI. Drag the animation slider, and you should see the animation playback.

You can load multiple animations into the scene. Every time you load an animation, a .ksanim file is saved with the same name as the source FBX. If your fbx is not named properly, you have to rename your clips to match our name conventions, for example steer.ksanim for the animation of the driver arms etc.
CHECKING CAR ANIMATIONS
When all your suspensions clips are exported to the proper animation folder (see “Project Structure” section), you can load your car.fbx in the editor and check if the animations work properly. You can do this only after you have created the animation clips and by loading them into the editor. NOTE: LOD B must contain the same null hierarchy and names of animated nulls as LOD A for the exterior (suspension, wings, pop-up lights), but not for animations in the HR interior (paddle and shifter) and the doors nulls under the Cockpit_HR null. Open you car_name.fbx After the car is loaded, you can load the clip of the suspension that you want to test. In the tab called “Car Animations” you’ll find sliders. These are designed to help you test the animation of the springs, the constraint of the arms and the wheel rotation.
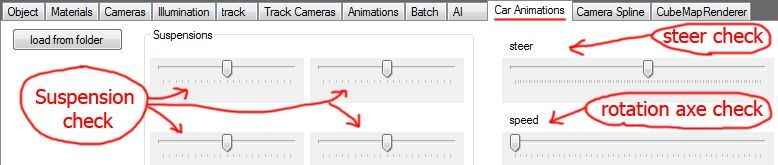
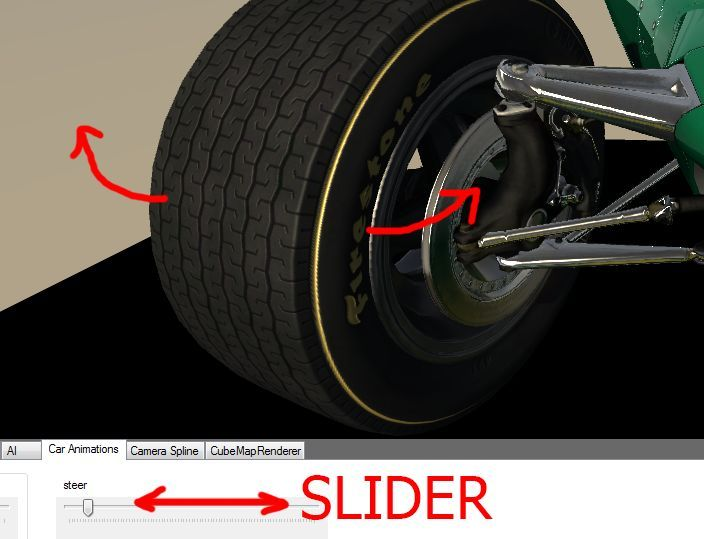
The sliders allow you to check the suspension in the editor and detect any issues, frame by frame. Here you can see an example: Moving the slider you can check the hub behaviour.
GENERIC ANIMATION EXPORTING GUIDELINES
There are some important things to keep in mind when exporting animations, especially door animation clips. When exporting a door clip, the following hierarchy should be present: Complex door animations
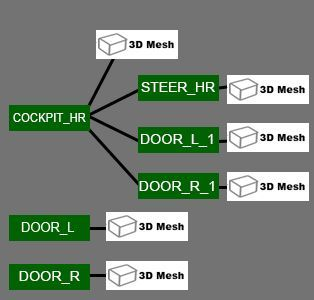
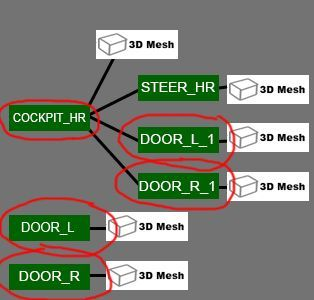
may include a higher number of nulls, make sure that the naming conventions are consistent and that you export every null that is animated (per side). For more information, see ANIMATION EXPORT. Note that the meshes and nulls of the interior door elements are under the null, COCKPIT_HR. This is needed because the cockpit switches from high to low resolution. The LR door will be hidden. So we have duplicated the door animation nulls with animation included, and placed them outside of COCKPIT_HR. When you export, remember to include all the cockpit door nulls (left image). NOTE: When exporting the animation of the paddle shifters (car_shift_dw and car_shift_up), make sure that you export the parent nulls as well. If the paddles are on the steering wheel, for each animation you have to export either of the paddle nulls (SHIFT_R or SHIFT_L), the null for the steering wheel (STEER_HR) and the HR cockpit null (COCKPIT_HR). To animate wipers, you may use a number of nulls depending on the complexity of the wiper. Usually a wiper with 2, maximum 3 pivot points (and thus 2 or 3 dummies) is sufficient. The wiper nulls must be located in the root of the scene and they must be present in LOD A through LOD C.