
6. Texturing Guidelines
The supported texture format is: directX DDS This format can be outputted from Photoshop (for example) using the specific nVidia plugin, available here: https://developer.nvidia.com/legacy-texture-tools As a general rule, we recommend using the DXT5 format with high-resolution textures (with or without Alpha) and 8.8.8.8 format for textures with sensitive gradient information (RGB maps, detailed normal maps) or small-size detail textures and 8.8.8.8 where Alpha information is included. We need for every texture a PSD source with layers inside. The layers must be placed inside layer folders with consistent and user-friendly names.
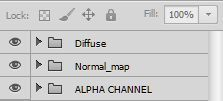
Inside every folder we need a base layer that allows us to change important features of the texture. Follow these rules: a) If the texture has an ALPHA CHANNEL, do not collapse transparent features, keep the transparent features in a specific layer. b) If there is a normal map, provide in the layer also the greyscale texture so that it can be re-generated with the nVidia tool c) ALWAYS work with DOUBLE resolution (no more no less) of the target image and shrink it to the right size only when you export the DDS. Test your results to be sure that the reduction does not spoil the image too much (this could happen with tiny texts or symbols). d) All PSD files must be in RGB Color 8 bit for channel mode. e) Name them correctly following our naming conventions.
TEXTURE NAMING CONVENTIONS FOR PSD SOURCE FILES
Skin.PSD contains the main body textures Ambient occlusion Wireframe (UV) RGB Map (material specular-gloss-ref map) Material IDs and zones Alpha channel Ext_Details.PSD contains rivets, bolts, logos, and decals on the exterior Diffuse Normal map Ambient occlusion RGB Map (material specular-gloss-ref map) Alpha channel Rims.PSD contains rim base and rim blur texture plus the blurred spokes Diffuse Normal map Ambient occlusion RGB Map (material specular-gloss-ref map) Alpha channel Calipers.psd contains the brake caliper texture Diffuse Normal map Ambient occlusion RGB Map (material specular-gloss-ref map) Alpha channel Lights.psd contains the light texture Diffuse Normal map Ambient occlusion RGB Map (material specular-gloss-ref map) Alpha channel Mechanics.psd contains the underside, engine and all the parts that are not included in the skin Wireframe (UV) Diffuse Normal map Ambient occlusion RGB Map (material specular-gloss-ref map) Alpha channel Glass.psd contains the glass texture and all similar parts such as black frame Diffuse Normal map Alpha channel Grids.psd contains tileable grids and similar textures (use more if needed) Diffuse Normal map Ambient occlusion RGB Map (material specular-gloss-ref map) Alpha channel Tyre.psd contains tyre textures with blur and dirt Wireframe (UV) Diffuse Normal map Ambient occlusion Alpha channel Disc.psd contains the brake disc texture and the glow texture Wireframe (UV) Diffuse RGB Normal map Glow map Windscreen.psd contains the fake internal glass reflection Diffuse Alpha channel INT_Decals.psd contains dials, dashboard symbols, cockpit details and logos, plates and interior bolts and stickers Diffuse Normal map Ambient occlusion RGB Map (material specular-gloss-ref map) Alpha channel INT_Details.psd contains coloured gradients and other details to use for smaller objects Diffuse Normal map Ambient occlusion Alpha channel INT_Occlusion.psd contains the cockpit ambient occlusion texture Wire frame stamp Diffuse Normal map Ambient occlusion RGB Map (material specular-gloss-ref map) Alpha channel Belts.PSD contains cockpit belts Diffuse Normal map Seams.psd contains stitching, seams, and similar textures in tileable form Diffuse Normal map INT_cockpit_LR.psd contains cockpit LOW RESOLUTION texture Ambient occlusion Wire frame stamp RGB Map (material specular-gloss-ref map) Material ID and zones Alpha channel All the extra textures that can occur and are not mentioned here can have a name that explains in brief what they contain. To see how to manage textures you can see examples in the example folder in the SDK.
EXPORTING TEXTURES AND OPTIMISATION
The carname_lod_A.kn5 file of an official car must stay below 44MB, including all textures and mesh. The textures have to be very well optimized. When the PC runs out of memory, the game engine starts to reduce texture size automatically, however, this is done in a way that does not ensure high quality, so we have to avoid it in all cases and stay below the 44MB limit for the LOD A.kn5 file. NOTE: As a general guideline, you can use the DXT5 compression for high-resolution textures. Use AL (8.8, alpha luminance) mode for grayscale textures with sensitive gradients. Use RGB (8.8.8) mode for map textures and ARGB (8.8.8.8) for NM textures with fine details. Remember to keep a complete set of ALL of your textures without compression as a backup so that if they have to be outputted again, there is no quality loss due to the added compression. NEVER use the DXT1 compression mode. Keep the PSD files organized and updated so that they can be used to re-output textures if a change is necessary after the delivery of the model. Do not work on compressed DDS textures, always make your changes in the PSD and keep it updated along with the exported textures so that the latest version of each PSD file corresponds to the latest DDS output. Below you can see some examples for texture size. Taking into consideration priorities to maintain a high-quality look, you can use larger textures provided that you optimize other textures better and you do not go over the limit: Skin_00.dds (the main body) must be 2048x2048 when it have sponsor and livery on. If is flat, can be 1024x1024 and saved as 8.8. Skin_00_map.dss 512x512 ARGB Rim.dds 512x512 It can contain a base material for rim blur non-transparent parts. Rim_map.dds is half of the rim size and saved as ARGB. Rim_Spokes.dds 256x256 INT_Occlusion.dds 512x512 and INT_Occlusion_map .dds 512x512 saved as 8.8. INT_Cockpit_LR.dds 512x512 or 1024x1024 depending from the car roof if open or close. DXT5 is enough. INT_Decals.dds 1024x512 DXT5 - INT_Decals_NM.dds 1024x512 in DXT5 or ARGB. Lights.dds 512x512 ARGB - Lights_NM.dds 512x512 ARGB - Lights_Map.dds 256x256 ARGB Grids tileable and various similar 256x256 or also half, depending on the image detail, export as ARGB. Tyre_D.dds and Tyre_NM.dds 1024x1024 DXT5 Tyre_blur_D.dds and Tyre_blur_NM.dds can be 512x512 or 256x256, save NM as ARGB. Disc_D.dds and Disc_NM.dds can be 512x512 DXT5 (D) ARGB (NM) when very visible and half when it is small and not very visible or when there are no details. Disc_Blur_NM.dds and Disc_Blur_NM.dds are half of the non-blurred disc textures. Disc_warm.dds is always 128x128. INT_Materials_D.dds and INT_Materials_NM.dds 512x512 or less, depending from image content. INT_Materials_map .dds is half of base texture, save all as ARGB (especially NM and RGB map) to keep the quality of the gradients. Damage.dds 2048x2048 - Damage_NM.dds is 512x512 - Damage_Mask.dds is 256x256 - Dust.dds is 1024x1024 DXT5. Stiching_D.dds and Stiching_NM.dds can be 256x128 vertically tileable, save as ARGB. Belt_D.dds and Belt_NM.dds can be 128x256 ARGB and must be vertically tileable. Mechanics_D.dds and Mechanics_NM.dds can be 1024x1024 if contain a visible engine. If not, it can be half. Mechanics_map.dds is always half of the diffuse one. Diffuse DXT5, NM ARGB, map RGB. Calipers.dds and Calipers_NM.dds can be 256x256 or in some cases can be part of the Mechanics textures if your car is a ‘60s open seater racing car. Calipers_map.dds is always half the size of the diffuse. DXT5 for diffuse, ARGB for NM and RGB for map texture.
OPTIMAL USE OF TEXTURE SPACE
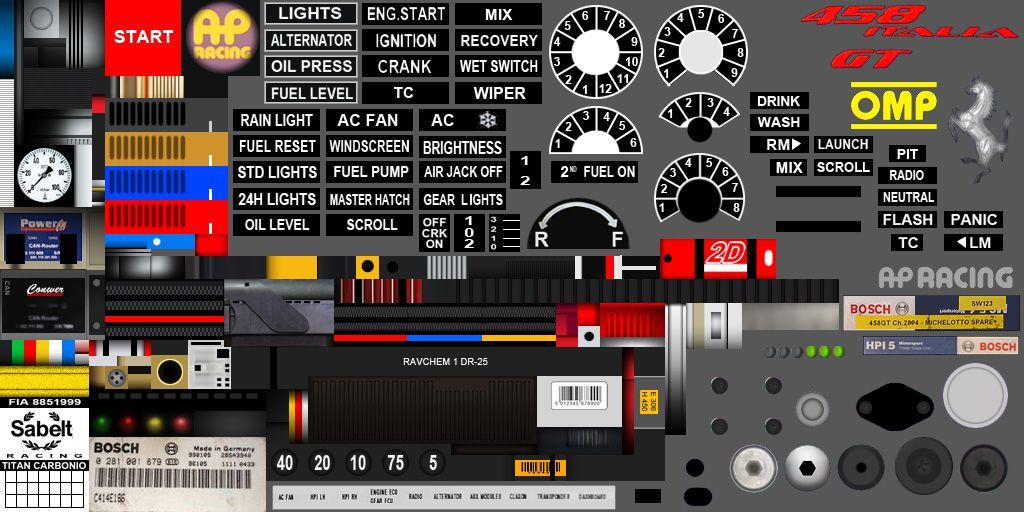
When you use your space in the texture you must make sure to optimize everything the best you can. Maximum means that all available space must be used. You have to plan before you start to make sure that you use your texture space in the most efficient way. An example for the Decals_D texture with good use of space:
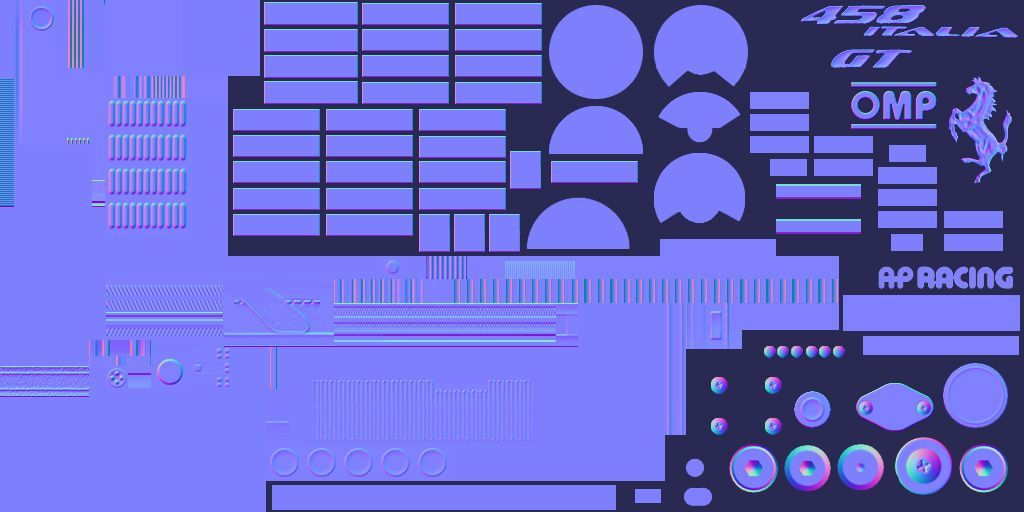
Include the alpha channel both in the diffuse and the NORMAL MAP to make sure it suits every shader type. In the following texture you can see the normal map texture with the alpha channel visible. The uncompressed alpha channel defines the outline of the details.
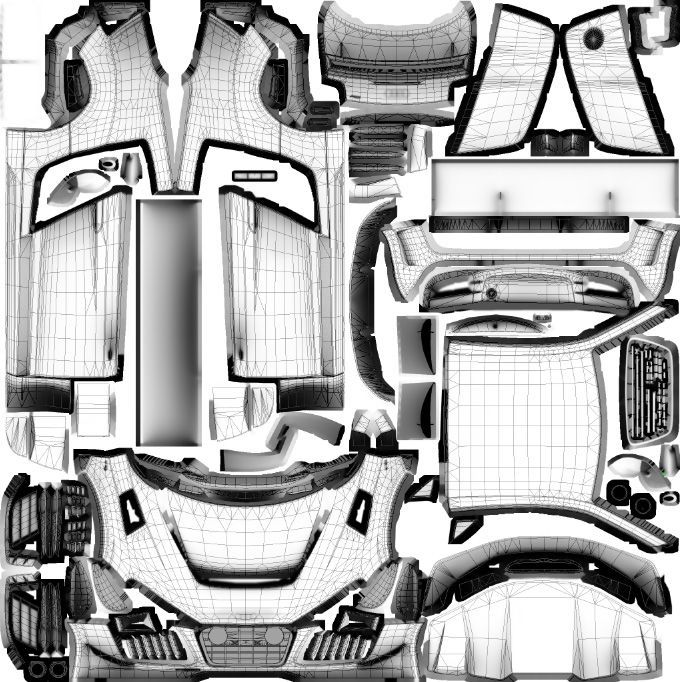
Look at the following examples for the occlusion or the car skin textures to see how to optimize the available texture space:
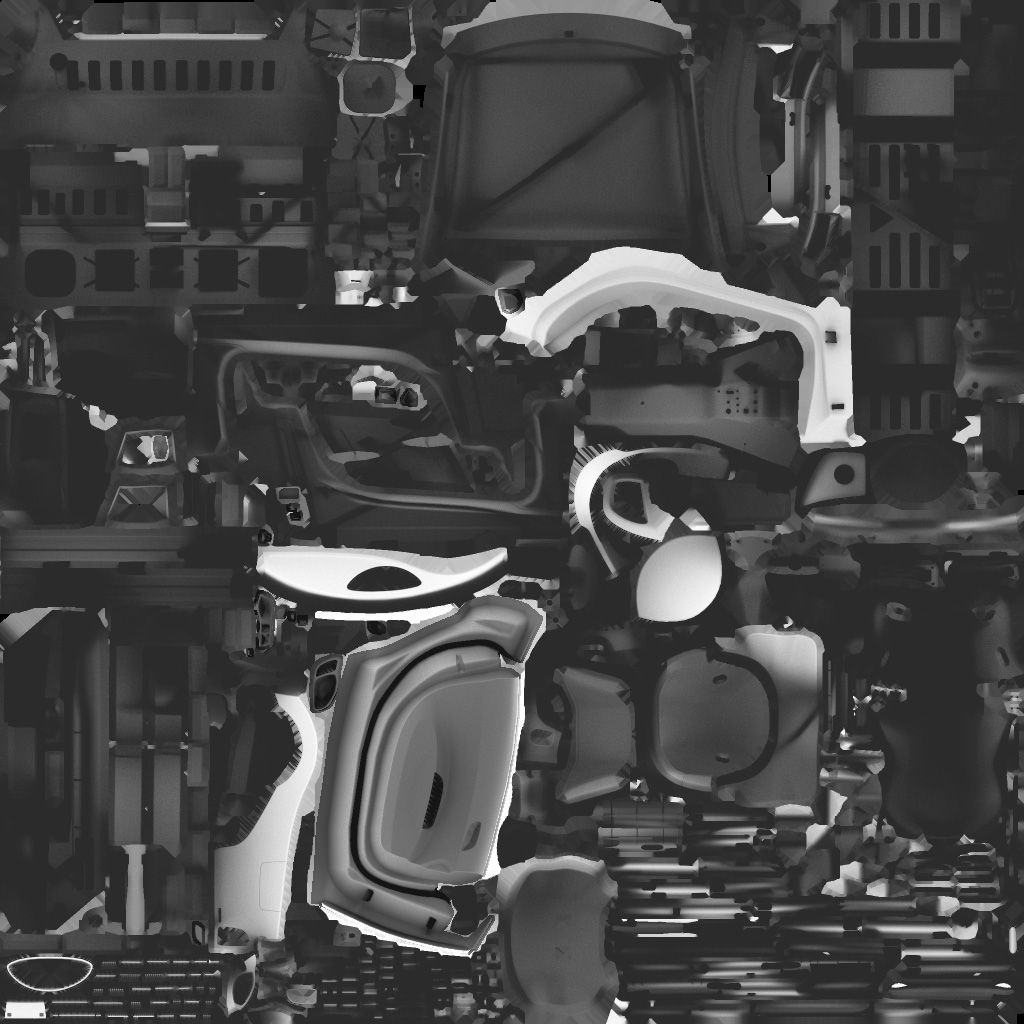
The parts use the maximum space available and and the padding (extension borders) fill up the remaining space. This arrangement allows us to reduce the texture to as low as 512x512 (uncompressed) but keep the occlusion gradients at an acceptable level of quality. It is recommended that all interior objects with an AO map be mapped on a single texture. The same material groups must use the same scaling to make sure the detail textures appear correctly. NOTE: You also have to make sure that in the UV map the different UV parts are using the same scale to make sure that any detail texture (metal flakes or carbon) appear correctly without any stretching and distortion! It is recommended that you use a checkered detail texture for mapping the body and interior textures that use detail textures. Also, and especially on the exterior, textures must be well organized. Look the second example:
BAKING THE AMBIENT OCCLUSION
To have a more realistic illumination effect, we need to bake the ambient occlusion map for the exterior of the car, the rims, the lights and the interior of the cockpit.
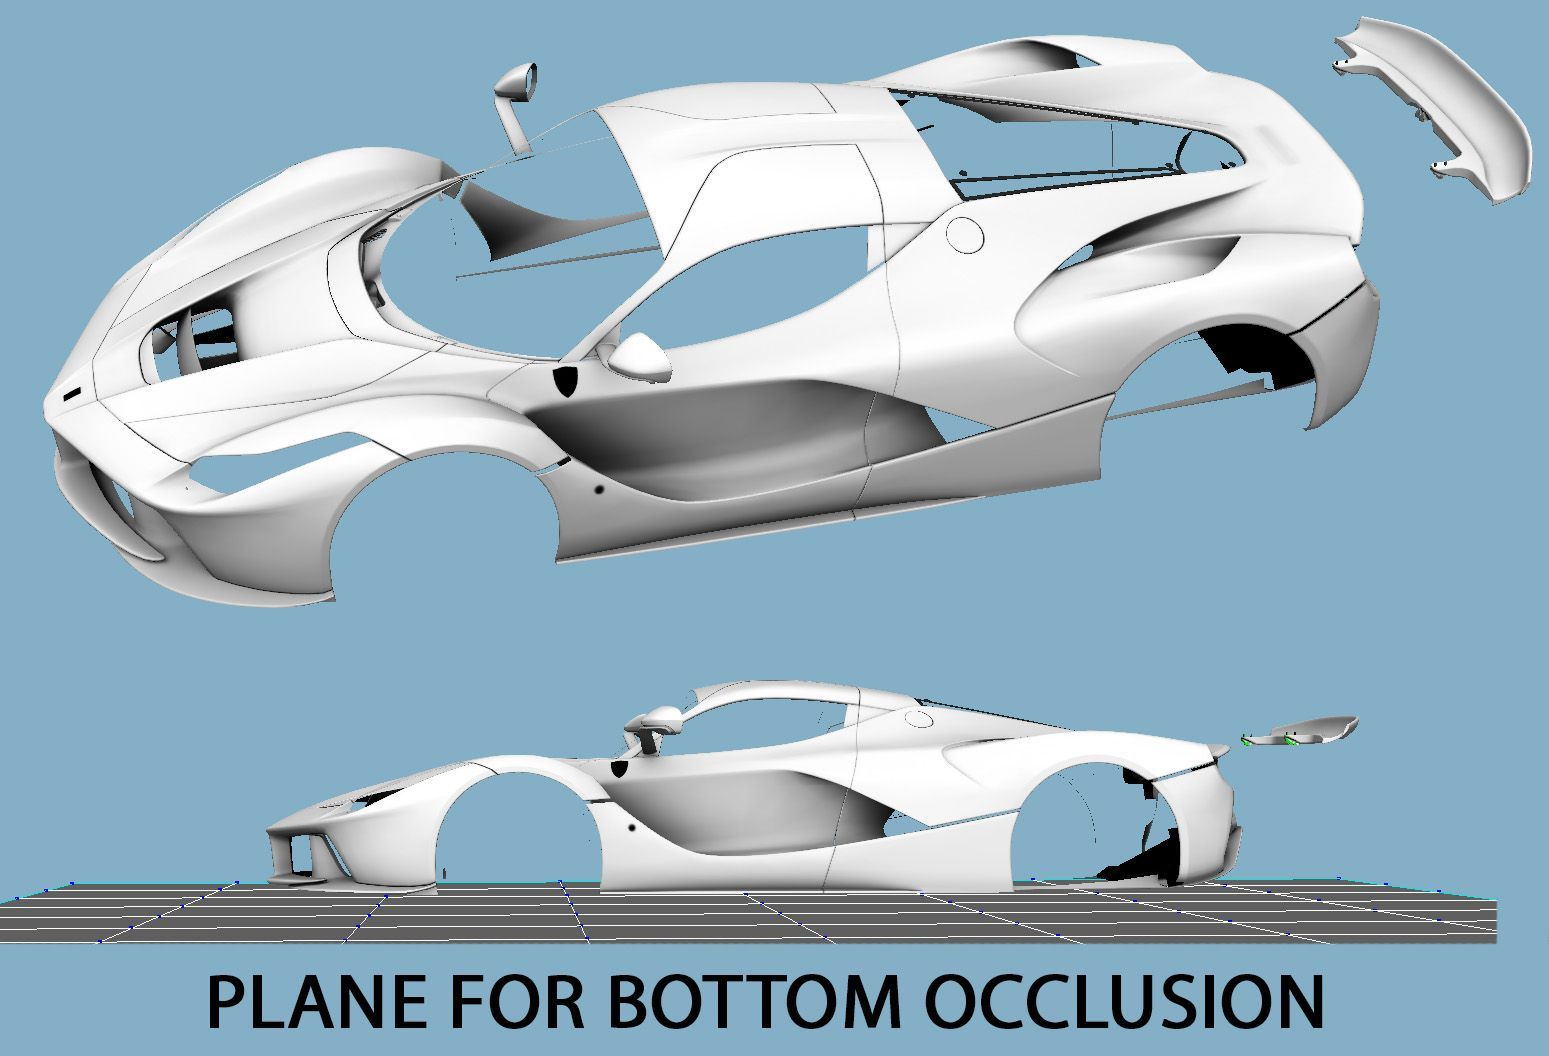
Take the exterior, and remove all the DECALS objects. If you have a movable wing move it a bit far from the body. Bake the Ambient Occlusion at double resolution (4096x4096). For the cockpit: remove all the DECALS for logos and the stitching. For baking the interior place the doors like in the image. For baking the steering wheel, remove everything else and bake it facing UP. NOTE: look the pink pieces, they don’t take occlusion, but they influence the cockpit for them. They will be placed under a different material.
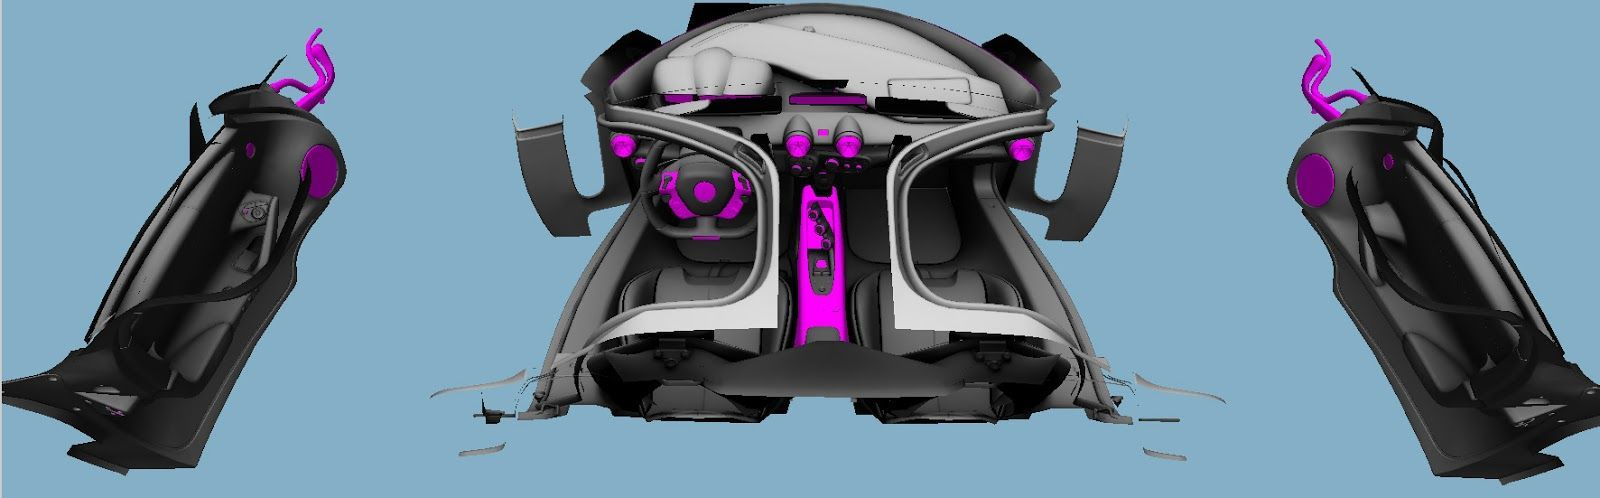
Keep the doors far enough to avoid a dark occlusion on the
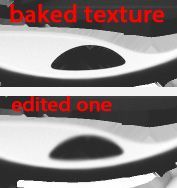
borders and the doorsill. A baked texture is never how we want it in the end. We suggest to edit it in Photoshop and create softer intersections with objects. Random pixels can create a bad effect when they are in a visible place. Use Photoshop to make the transitions smoother where necessary. The AO textures are globally a kind of soft gradients. Avoid sharp, pixelated and unclean transitions. IMPORTANT: when baking make sure you use a wide-enough padding to avoid bleeding black artifacts around the edges with low-resolution textures. NOTE: With high-quality occlusion maps, such as those baked using V-Ray, will require less retouch in PS later on so it is worth spending more time on how to bake the textures at the best possible quality.